As much as it can seem like a status symbol to be verified, there are also really practical reasons to have a verified Instagram account.
Verification helps with engagement, can help Instagram users find real sources of news, and can stop impersonation, among other things.
Getting verified adds credibility to any account — so it’s no wonder that so many of us are keen to have that blue check on Instagram. And, with the roll-out of the new Meta Verified subscription, getting that little icon is not only reserved for public figures (as long as you’re happy to pay a monthly fee, of course).
In this post, we’ll cover what verification is, the two ways to get a blue check on the social media platform (with and without paying for Meta Verified), plus some FAQs about the blue tick.
Let’s dive in!
What is Instagram verification?
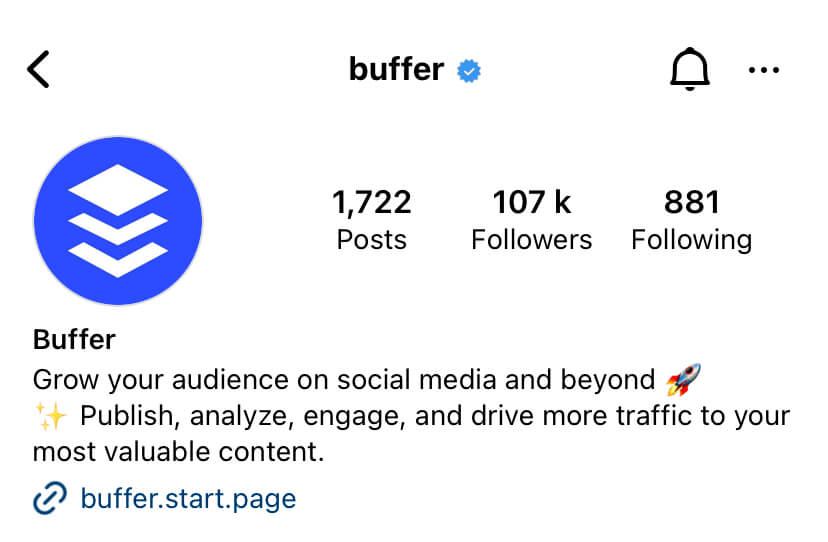
You’ve almost certainly seen the blue check next to an account’s name on Instagram — that means that the account in question has been verified.
Before the introduction of Meta Verified, that blue badge meant that Instagram had confirmed that the account was both authentic, and represents a notable brand or influencer, public figure, or celebrity.
But now Meta Verified offers another route to the verified badge, and Meta, the company that owns Instagram and Facebook, is keen to differentiate between the two:
The difference between Meta Verified and verified badges
While both of these are routes to getting the coveted blue check next to your Instagram handle, Meta seems to be keen to draw a line between the two. Here’s how they explain it in Instagram’s Help Center:
“Verified badges are different from Meta Verified.
Verified badges confirm that a notable account is the authentic presence for that person or brand.
Meta Verified is a paid subscription that confirms that the account is validated and authentic. This subscription comes with a bundle of features and benefits available for both eligible profiles and eligible businesses.”
Reading between the lines of this help article, it looks a lot like Instagram might consider changes to the notable person verified badges in the future:
“As we test and learn, there will be no immediate changes to accounts on Instagram or Facebook that are already verified based on prior requirements.”
What are the benefits of getting a blue check on Instagram?
Verified badges are effectively a signpost for Instagram users that certain accounts are authentic — no bots, fake accounts, meme accounts, or even fan accounts are eligible. “If an account has the verified badge, we've confirmed that it represents who it says it does.”
There are a number of benefits to having a verified account on Instagram. If you are a brand or business, getting verified could be a powerful tool in your social media marketing strategy:
- It adds credibility — this can be key if you’re sharing important research, news, or articles.
- It helps you stand out in search results — verified accounts appear at the top of Instagram search results.
- Verification assists with impersonation issues — Instagram won’t verify more than one instance of a person or brand, so you can trust that the one that is verified is the real account.
- Plus, verified accounts get higher engagement rates. A study of 6.5 million Instagram accounts discovered that accounts that are verified on Instagram get on average 30% more engagement than other accounts (though this study was conducted with the old, notable figure version of the badge).
If you opt to go the Meta Verified subscription route, you can expect some extra benefits, per Instagram:
- Account protection. Get added protection from impersonation with proactive account monitoring.
- Customer support. Access support for subscription and account issues.
- Exclusive features. Get exclusive stickers on Stories and Reels.
- Get featured in the 'Meta Verified' feed. In October 2023, Instagram shared they were testing the ability to view only the content of Meta Verified people in your main feed, per the mock-up below.
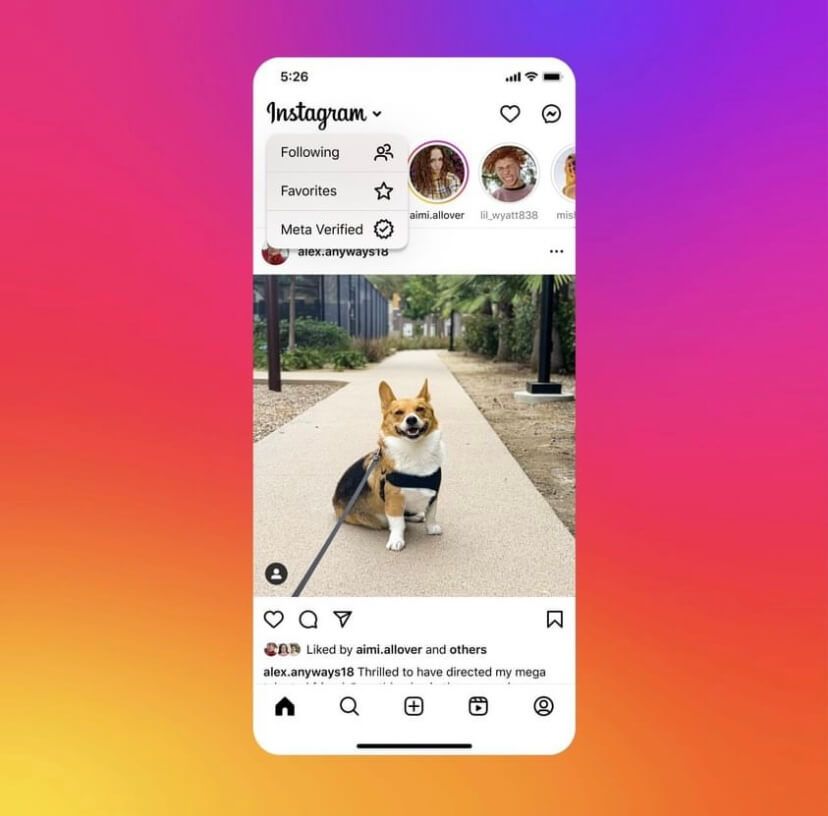
Source: IG Updates Broadcast Channel
How to get verified on Instagram
As previously mentioned, there are now two ways to get a blue tick on your Instagram account. The first we’ll unpack here is the simplest, and you don’t need to be a notable figure to do it — but the social media platform will charge you a monthly fee.
Option 1: Subscribe to Meta Verified
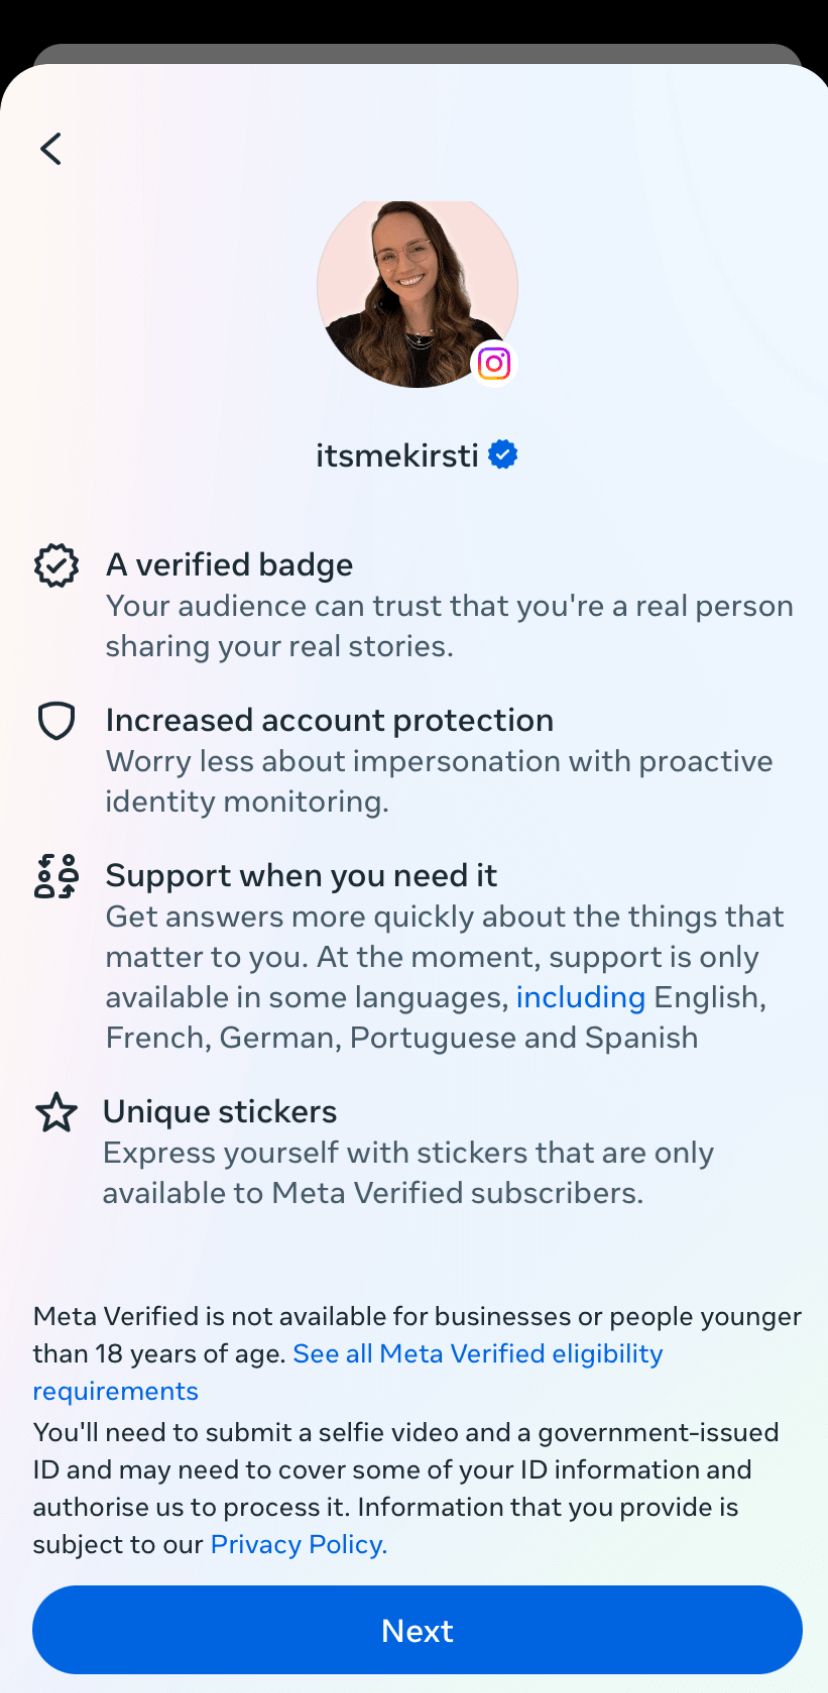
First, you need to make sure you meet the Meta Verified eligibility requirements. To go this route, you’ll need:
- To be at least 18 years old.
- A public or private profile that's associated with your full name and has a profile photo that includes your face.
- To meet minimum activity requirements, such as prior posting history.
- A valid photo ID that matches your profile name and profile picture.
- Two-factor authentication enabled on your profile.
- To follow our Terms of Use and Community Guidelines.
If you’re sure you meet all the requirements, here’s how to sign up for Meta Verified via Instagram:
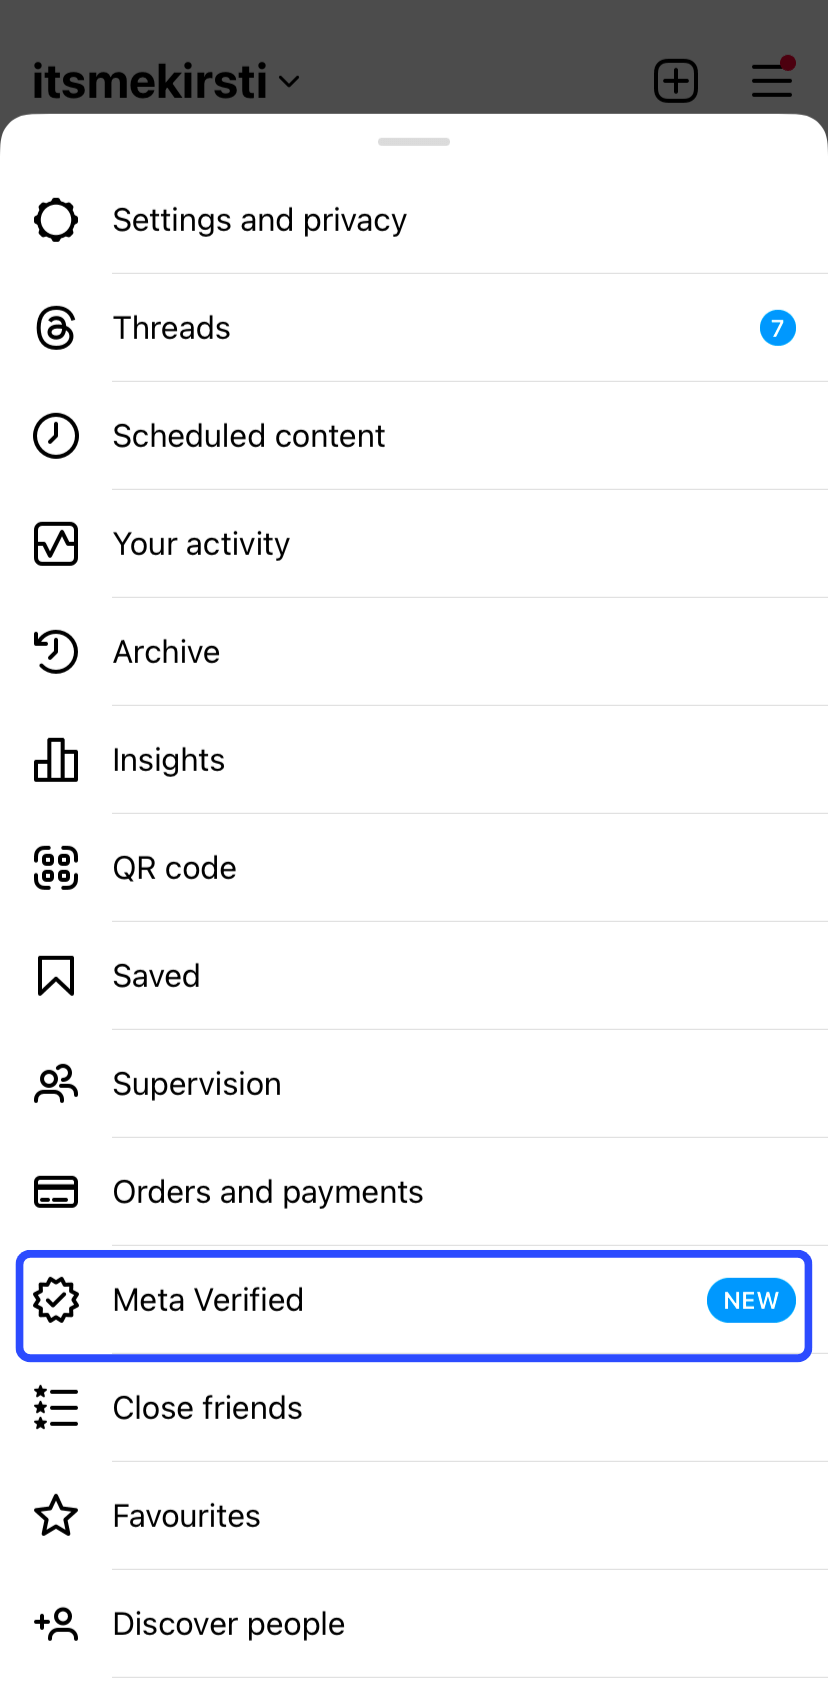
- Head over to your Instagram profile by tapping your profile picture on the bottom right of the app.
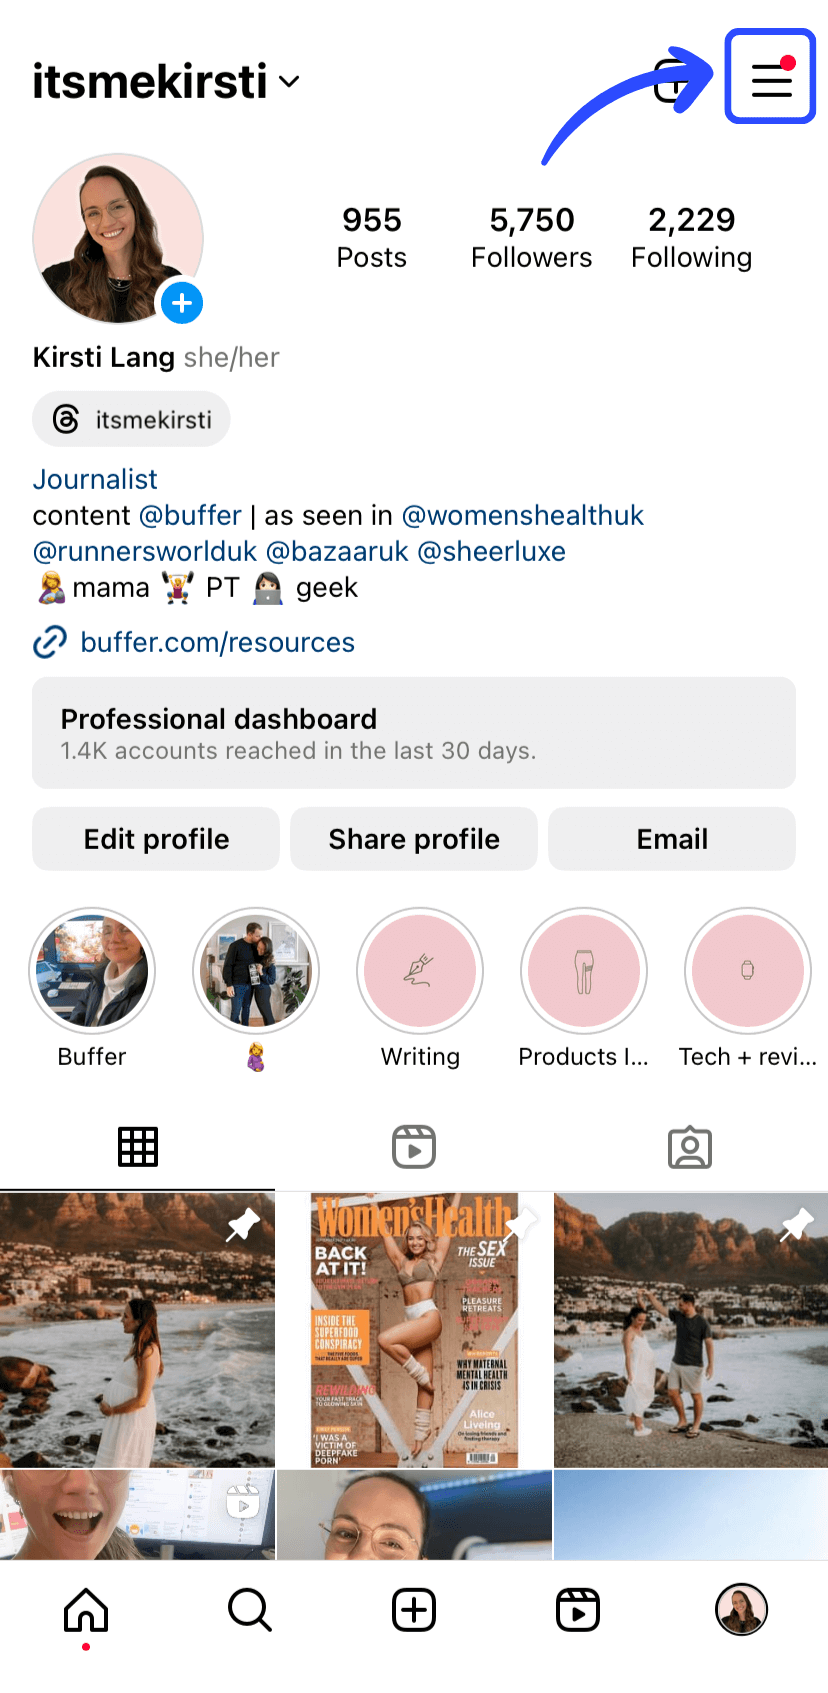
- Tap the hamburger menu (the three lines on the top right).
- Choose ‘Meta Verified’. Read through the explainer, then tap ‘Next’.
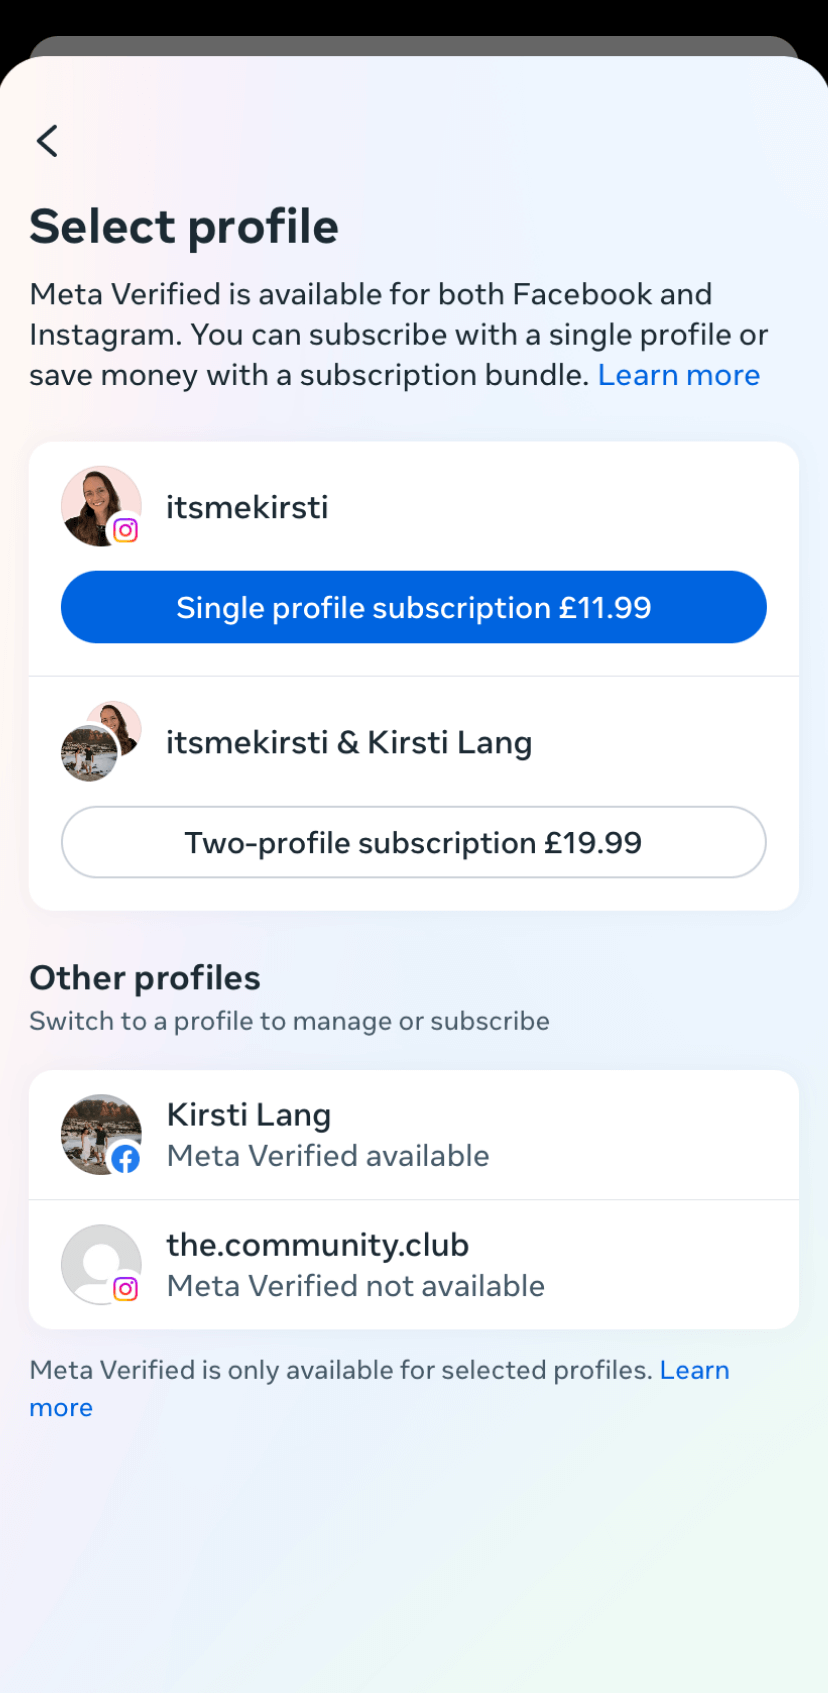
- Choose which Meta accounts you’d like verified.
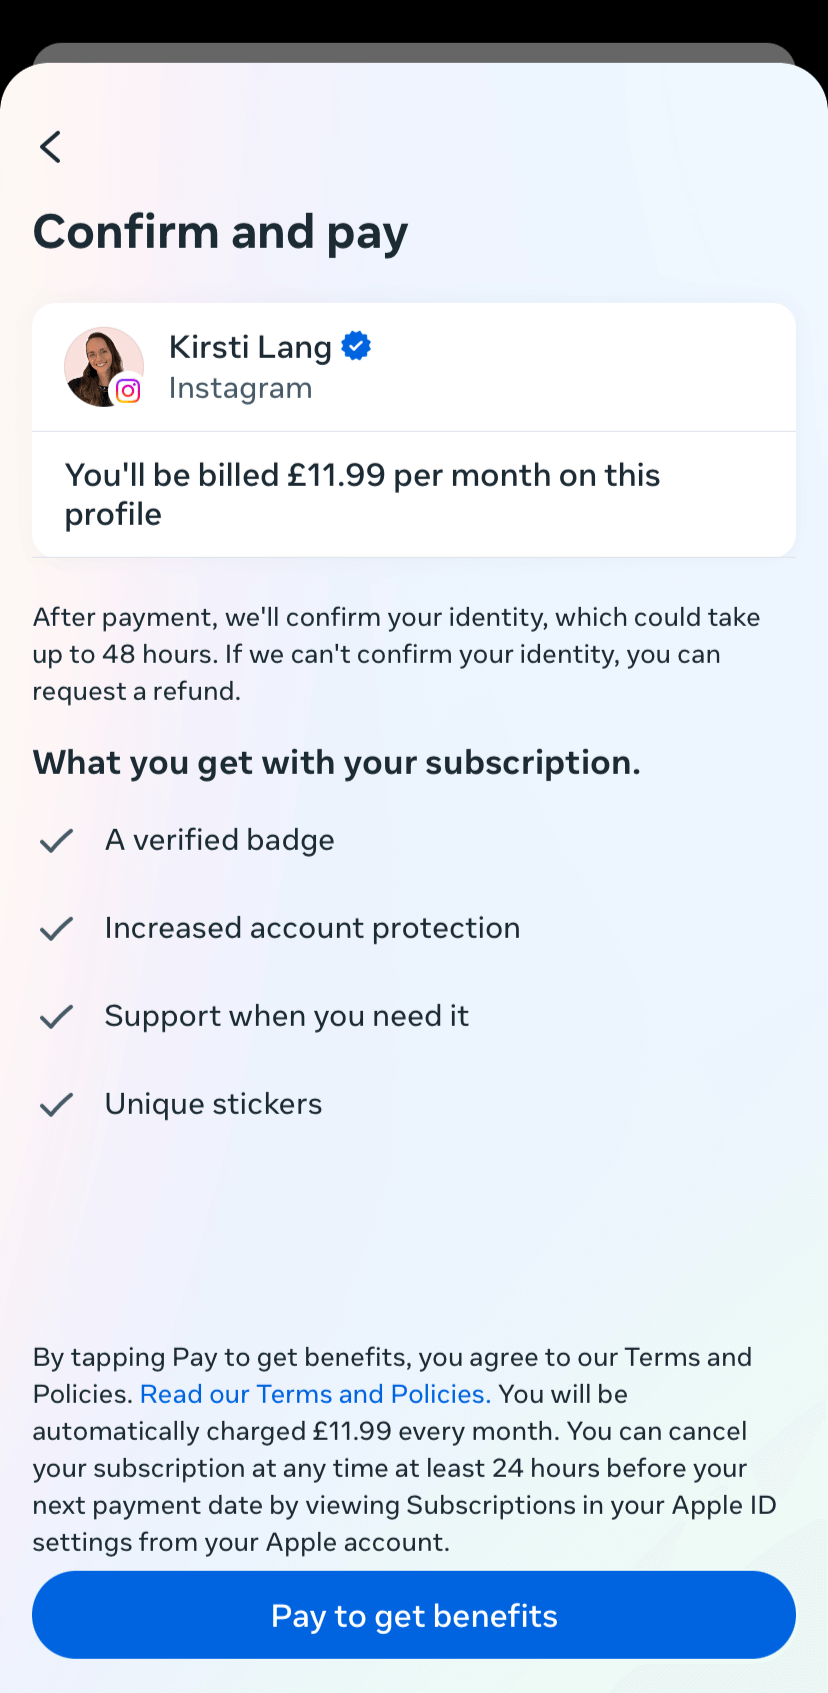
- Confirm and pay. From here on out, you’ll be charged the monthly subscription fee unless you cancel. It could take up to 48 hours for your blue tick (and all the benefits) to appear.
Option 2: Get verified as a public figure
This route to getting Instagram verified may be free, but there are a few more hoops to jump through. Here’s a step-by-step guide to the verification process for notable figures.
Step 1. Follow standard best practices on Instagram (easy)
To be eligible to be verified on Instagram, you need to do a few pretty standard things:
- You have to follow Instagram's Terms of Use and Community Guidelines
- You have to represent a real person
- You need to represent the unique presence of that person or business (only one account per person/business can be verified)
- And you have to have a complete profile: that means a profile picture, a bio, and a public, active account
Step 2. Prove that you are a notable account (more difficult)
This is where most people run into problems because you have to prove to Instagram that you are notable, which is easier for some than others. Being notable means you represent “represent a well-known, highly searched-for person,” according to Instagram.
Instagram shared a helpful tip: when looking at verification, they look for accounts that have been featured in multiple news sources. Paid and promotional content does not count. They also shared that they recently “expanded our list of news sources to include more diverse outlets including those from additional Black, LGBTQ+, Latinx media, and including more outlets from around the world for example.” Which is great news!
If you haven’t yet been featured in multiple outlets, head down to the next section on tips for getting verified and we will walk you through some advice. If you do have this proof, you can move on to submitting your application.
Step 3. Submit an application to Instagram (easy)
The actual application to be verified isn’t too bad, you do it right from within your own Instagram account. Here’s how to request to be verified on Instagram:
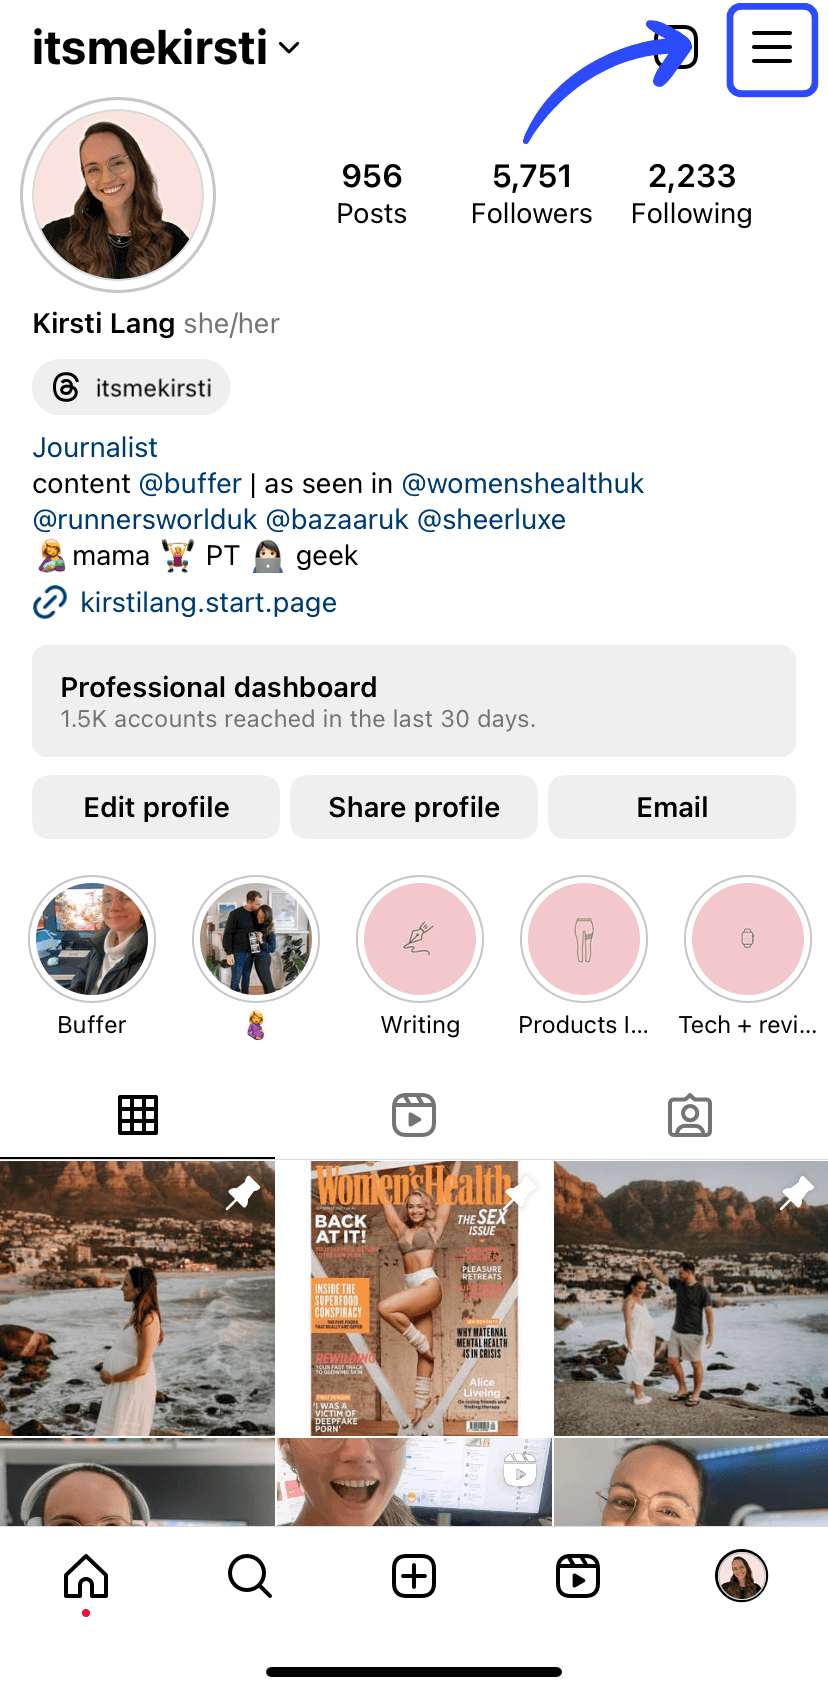
- From your Instagram account, tap on the hamburger menu in the top right corner.
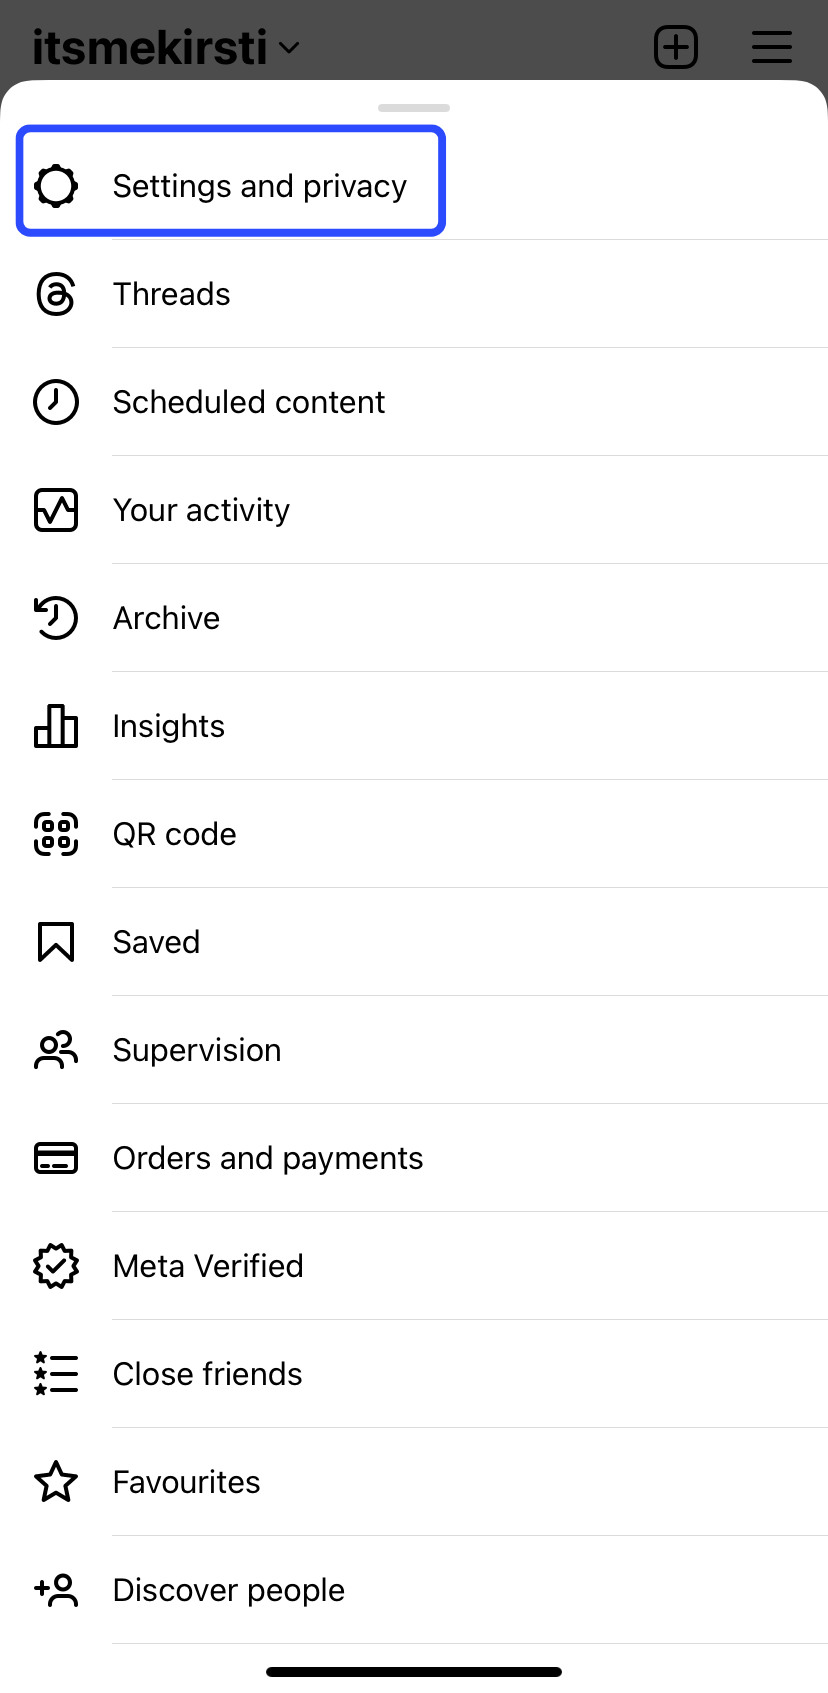
- Tap on Settings and privacy.
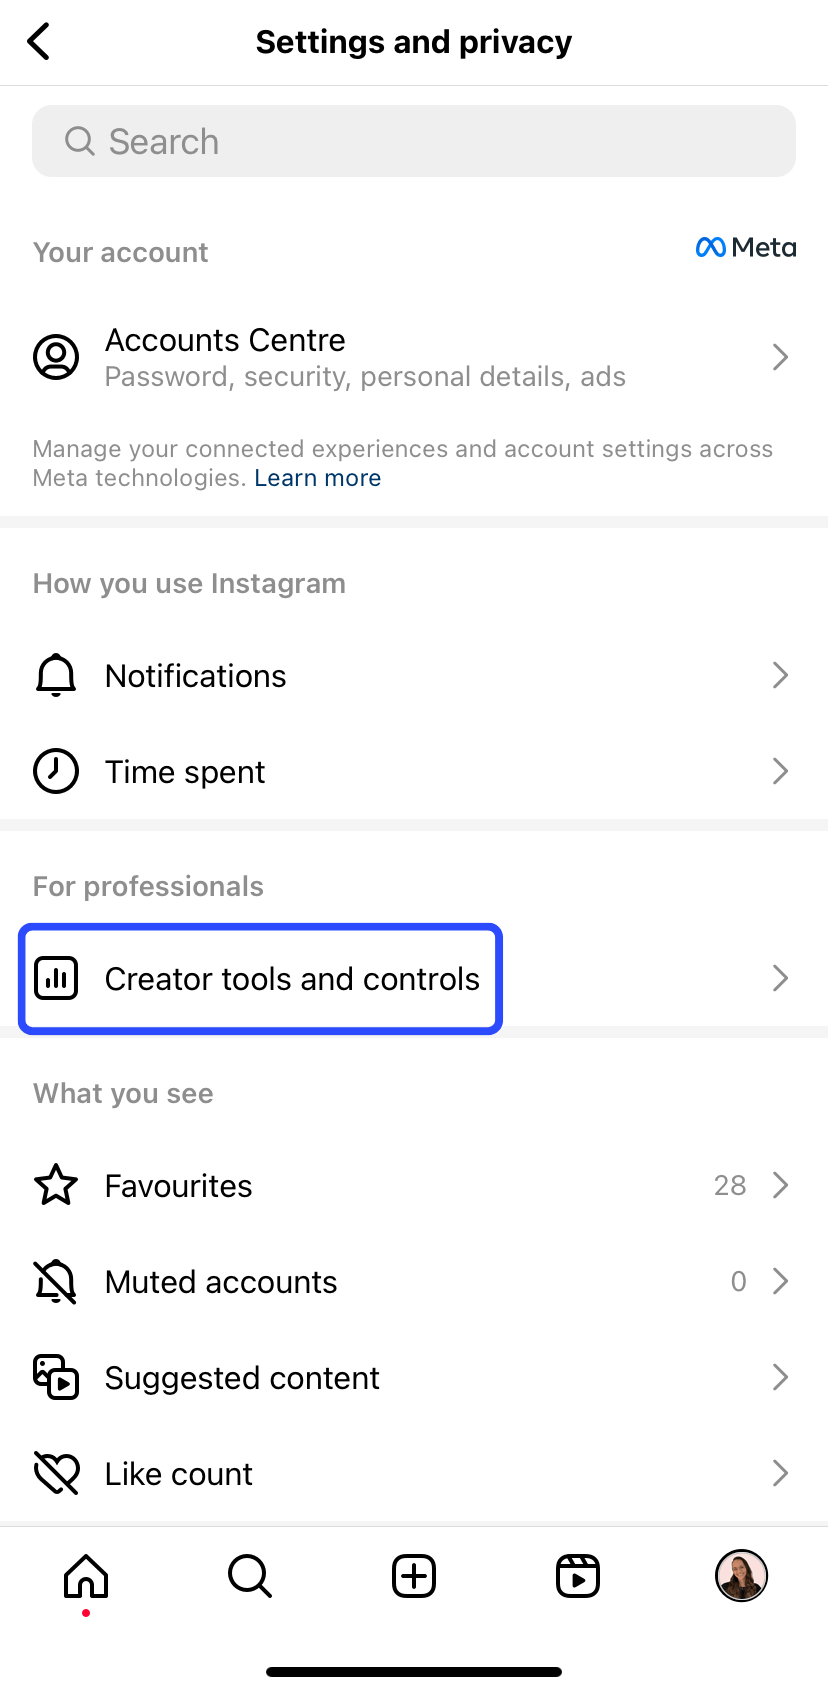
- Tap Creator/Business tools and controls in the ‘For professionals’ section. (The button name will depend on whether you have an Instagram Creator account or Business account.)
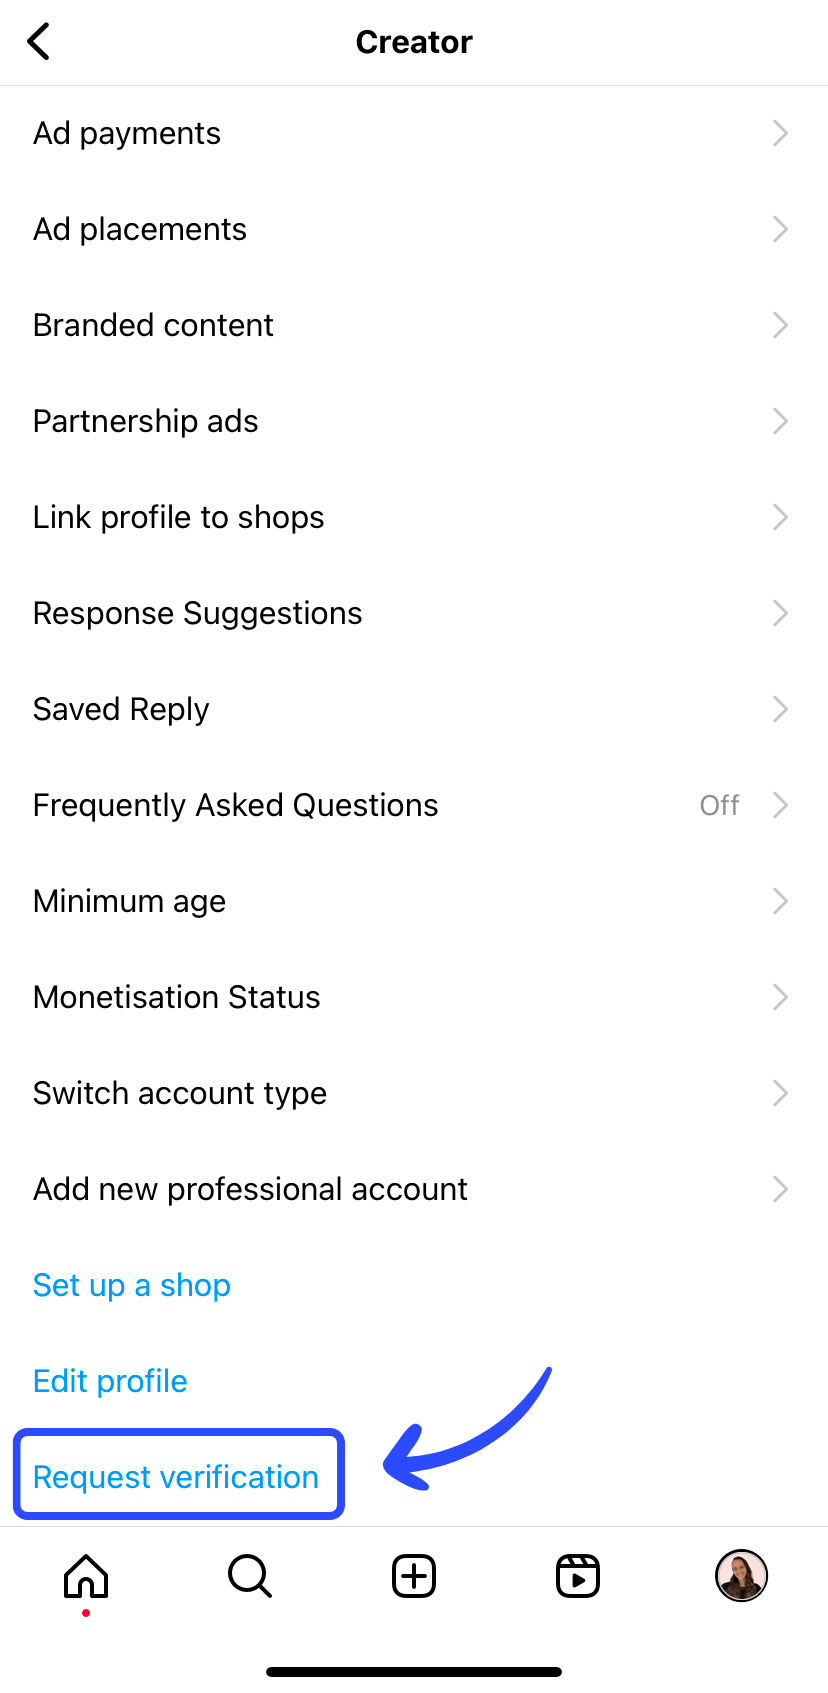
- Tap Request verification at the bottom of the page.
- Fill out the form (you’ll be asked for an identification document like a driver’s license or passport, your creator category, and links to various articles and other sites you are featured in). When you’ve filled it all out, hit Submit.
That’s it!
You will be notified from Instagram within 30 days if your application is successful. If you don’t get verified, you can apply again in 30 days. Note that if you apply more than once before they review your original application, they will cancel the application entirely — so it’s worth it to be patient here instead of spoiling your chances of getting that blue check.
Tips for increasing your chances of being verified as a notable figure
Now, of course, if getting verified were easy, almost everyone would do it. But it’s not — so here are some things you can do to increase your chances of being verified.
Grow your following on Instagram
Instagram verifies accounts that are active on the platform, so stay active while working to grow your account. Part of being notable in Instagram’s eyes is how many people are following you on the network, so it’s never a bad thing to keep increasing that number.
We can help with that:
- Check out our complete guide to Instagram growth or dive into Instagram for small businesses.
- Learn the ins and outs of the Instagram algorithm, figure out the best time to post on Instagram, and lean into tools like hashtags and Instagram’s newest features.
- Stay consistent with your posting schedule and check your analytics to see what kinds of posts are performing best. You can try Buffer for free to set up a consistent posting schedule across Instagram posts, Reels, and Instagram Stories.
Get media mentions
Easier said than done, but entirely possible. You want to start with at least three links for your application, and that’s an achievable goal. You can start reaching out to publications that you believe would be interested in your story or what you’re working on and pitch them your business. If you have the budget, you can also hire a publicist or PR agency to help as part of your marketing strategy.
Be strategic about when you apply
If you don’t have a really strong case for being verified, be strategic about when you send off that request. Is a Reel of yours going viral right now? That’s a great time to apply. Did you just get a ton of press mentions in a week? Go ahead and apply! Timing can be everything, so make sure you are careful and thoughtful about your application.
FAQs about verification on Instagram
How many followers do you need on Instagram to get verified as a public figure?
There isn’t a requirement to have a certain number of followers to get a blue check, however, you have to prove that you are notable, and part of that notability is having people interested in following you.
Instagram will likely take follower count into consideration when they are reviewing your application, which is why we recommend growing your Instagram following before you apply.
How long does it take to get verified on Instagram?
Applying for verification as a public figure takes about 30 days, however, you can be approved and verified much sooner than that. It depends on the team that is reviewing those applications, so it varies a lot.
Getting Meta Verified happens much faster. Once you’ve made your first monthly payment, you can expect to see your blue check — and all the other benefits — on your profile within 48 hours.
Do you have to pay to get verified on Instagram?
If you’re not a public figure who can apply for free verification via the steps we’ve outlined above, then yes — a Meta Verified subscription is the simplest way to get your verification badge.
Be warned, though: There are plenty of scams and websites that promise to get you verified for a fee. Steer clear of these — the only way to get verified is via Instagram or Facebook.
How much does a Meta Verified subscription cost?
Getting verified on Instagram will cost $14.99 per month (slightly more if you opt for bundling your Facebook page or profile into your subscription). Note that the cost may vary depending on your region.
If you’re after your public figure verification badge on Instagram, the best approach is to work your way up gradually. Over time, you can grow your following and prove your notability, which will significantly help the success rate of your application. If you’re off to apply for that verification right now — good luck to you!


