During Ramadan of 2023 (March 22– April 21), Indonesian telecommunications brand Tri wanted to boost brand awareness and buyer action for a Gen-Z audience. To accomplish this, they decided to add an Instagram Reels ad campaign to their usual social media marketing strategy.
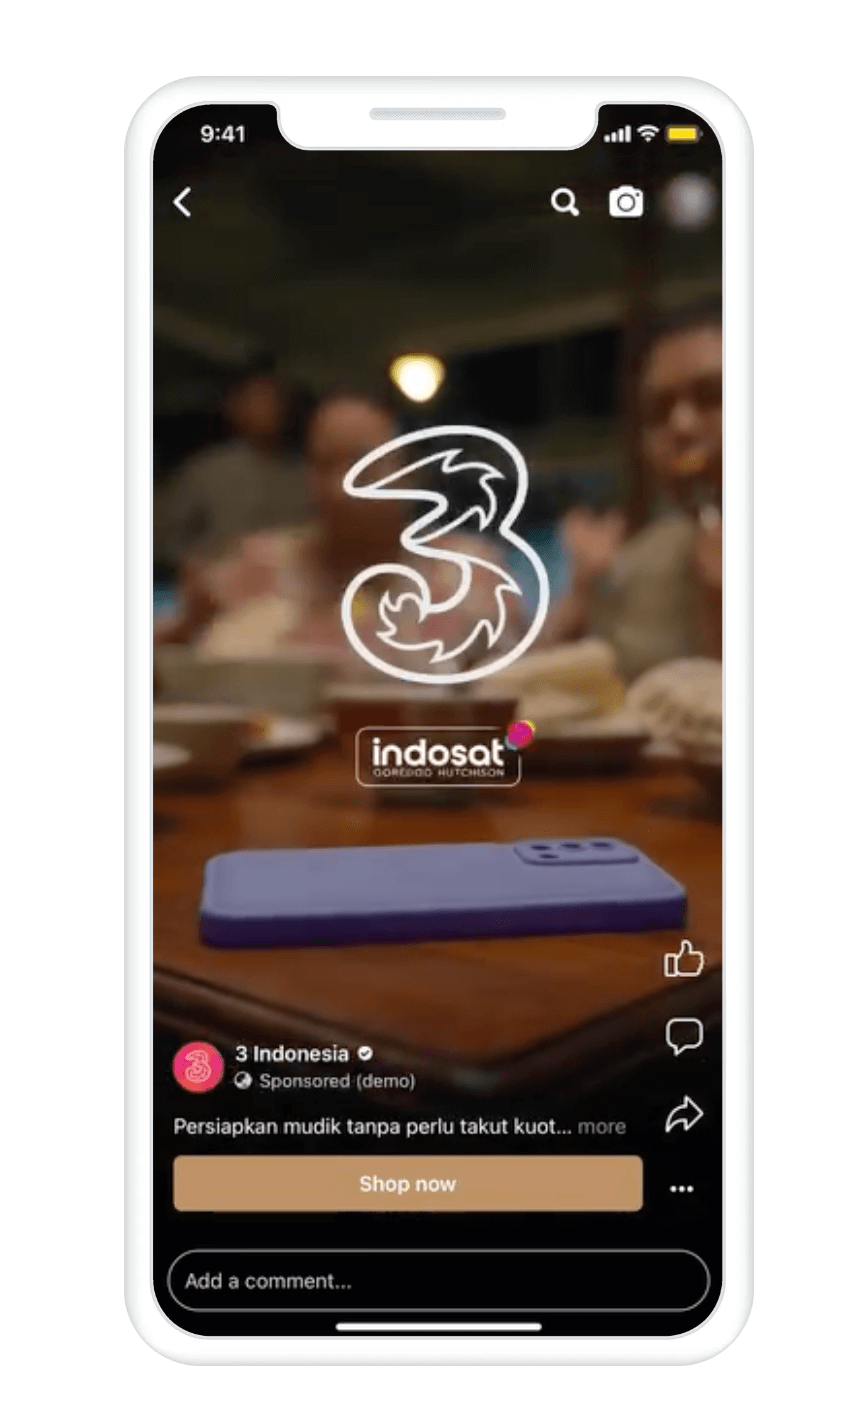
The Instagram ad ran for one month and targeted an audience aged 21–34 in Indonesia. The result?
- Instagram Reel ads were 65 percent more efficient in driving action intent compared to the usual campaign alone
- The Instagram ads were three times more effective in increasing brand awareness in contrast to only the organic campaign
Instagram ad campaigns can be an excellent addition to your Instagram marketing efforts if you have the budget. The problem? Getting a positive return on investment (ROI) from Instagram ads is like navigating a spiderweb. There are multiple ad formats, the ad manager is overwhelming, and how you can prepare a winning strategy is unclear.
Worry no more: In this guide, I’ll take you from the A to Z of Instagram advertising. By the end of this piece, you’ll be equipped to run Instagram ads successfully (and with confidence!).
⚠️ Note: Instagram uses the Facebook (or Meta) ads manager to run ads. Meta (the parent company of Instagram, Facebook, and WhatsApp) continually updates its ad manager’s features and aesthetics to be more user-friendly. While some functionalities may get a facelift, the core components remain the same. If any screenshots in this article look different from your screen, read the accompanying text to understand the full context.
What are Instagram ads?
Instagram ads are paid posts you can use to promote your business, product, or services. The ads appear just like organic posts in-feed, Stories, Reels, and the Explore page on the Instagram app.
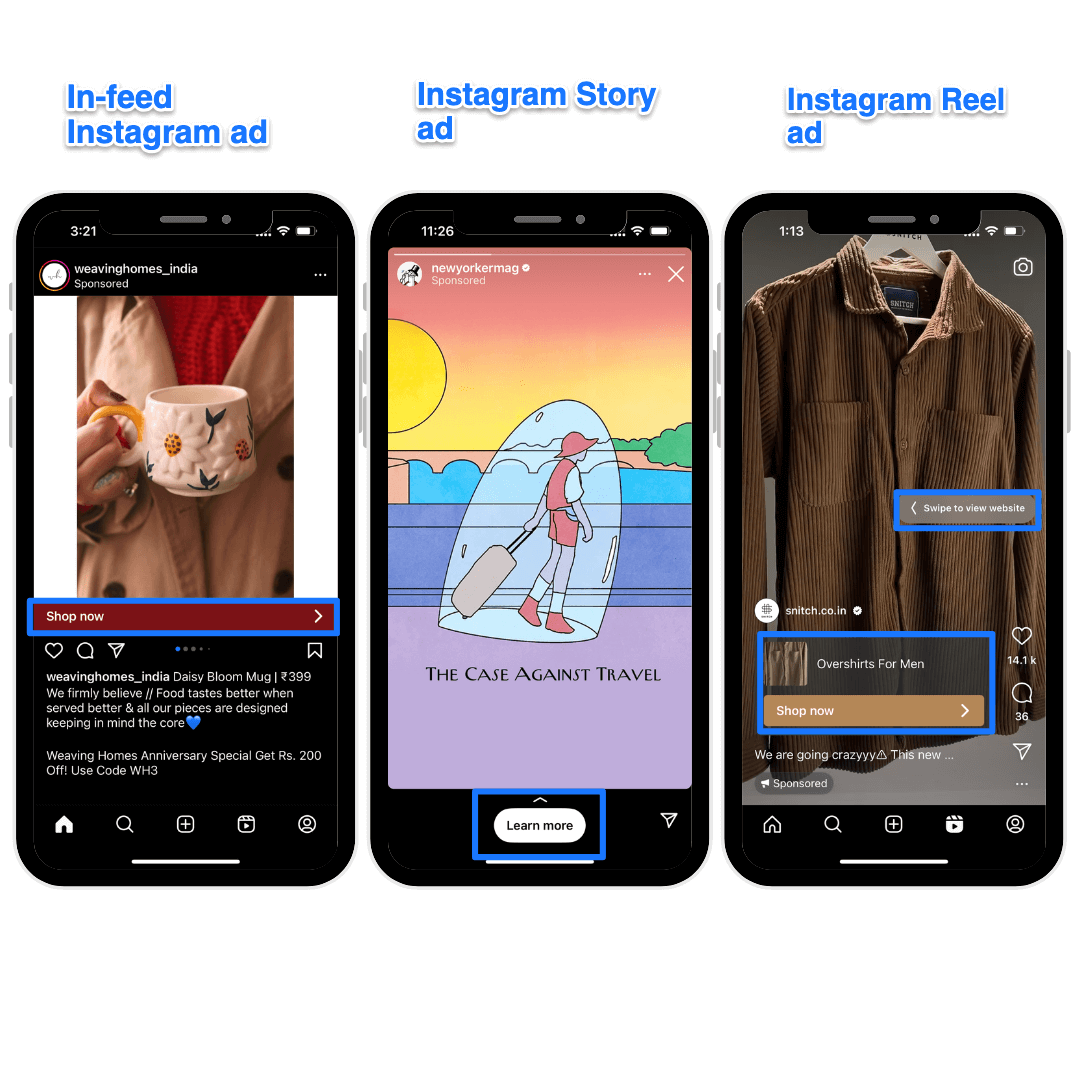
Unlike organic Instagram posts, Instagram ads are accompanied by a link to your product, website, or direct messages (DMs). This is the marker of an Instagram ad alongside the “sponsored” label.
How much does Instagram advertising cost?
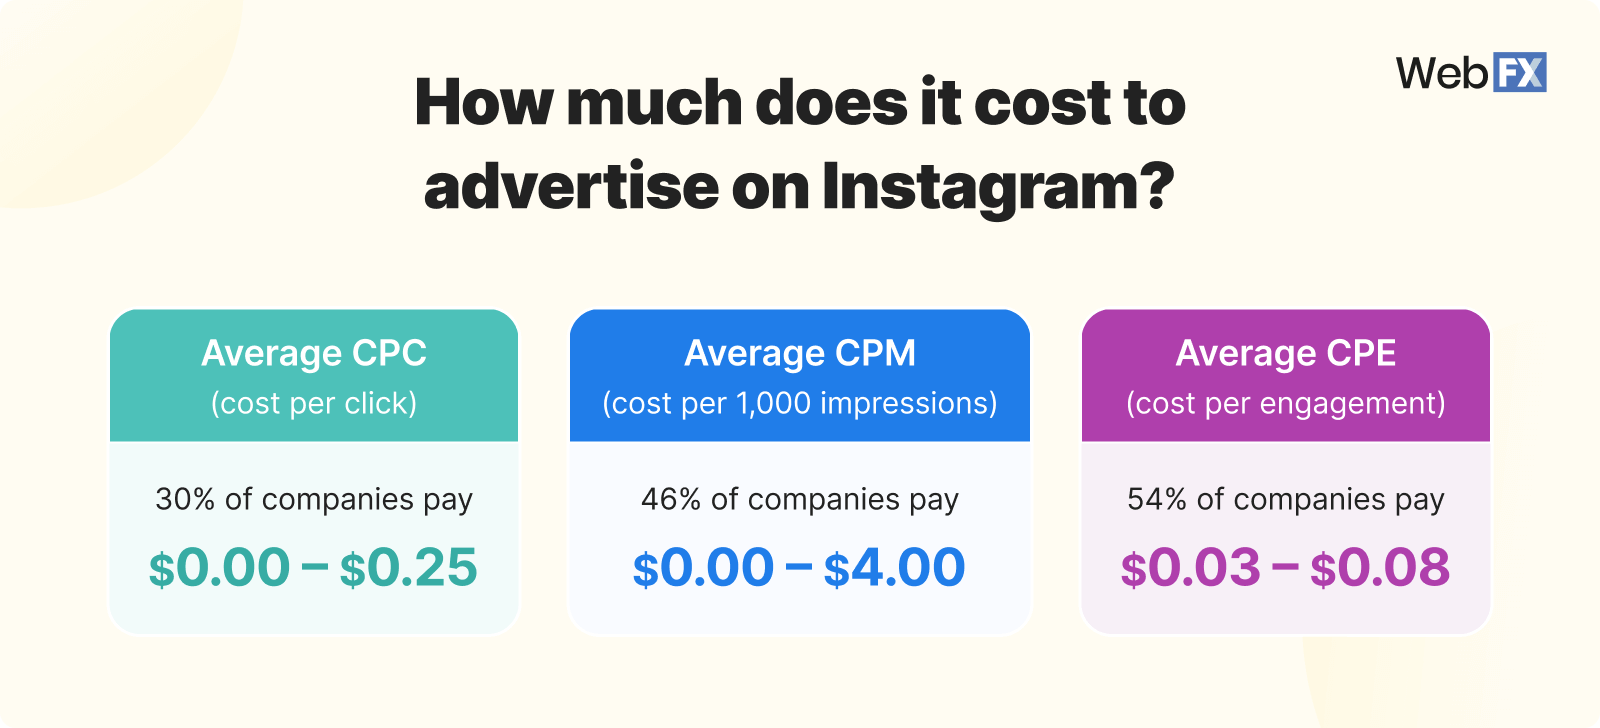
The pricing of Instagram advertising primarily depends on how much you’re willing to bid, the type of ad you’re running, and the competition in your industry, among other factors. WebFX asked 270 marketers how much their company spends on Instagram ads and found:
- $0 – $0.25 cost per click (CPC)
- $0.03 – $0.08 cost per engagement (CPE)
- $0 – $4.00 cost per 1,000 impressions (CPM)
You can also go to Revealbot to get up-to-date ad cost data, but remember, it's calculated only from campaigns targeting audiences in the United States.
The above can help you decide how much money you should dedicate to Instagram advertising from your paid social budget. Your ideal number should be a sweet spot: Large enough to make you care and check back on performance — but small enough so it’s not damaging.
3 things you need to create Instagram ads
Before we get into the specifics, here’s a checklist of the tasks you need to finish before your account is enabled for creating and running ads on Instagram:
1: An Instagram business account
Instagram has two types of accounts: Personal and professional. Personal Instagram accounts are private and can be followed by request only. Professional accounts are further bifurcated into Business and Creator accounts. While the Creator Instagram accounts can also run ads, it’s best to switch to a Business account to access all the features of the professional dashboard (like the “contact us” button).
Here’s how to switch to a business account on Instagram:
1. Go to your profile and tap the three horizontal lines in the upper right corner.
2. Click on “Settings and Privacy” and go to “Account type and tools” under “For professionals.”
3. Tap “Switch to professional account” and follow the instructions to set up your Business account.
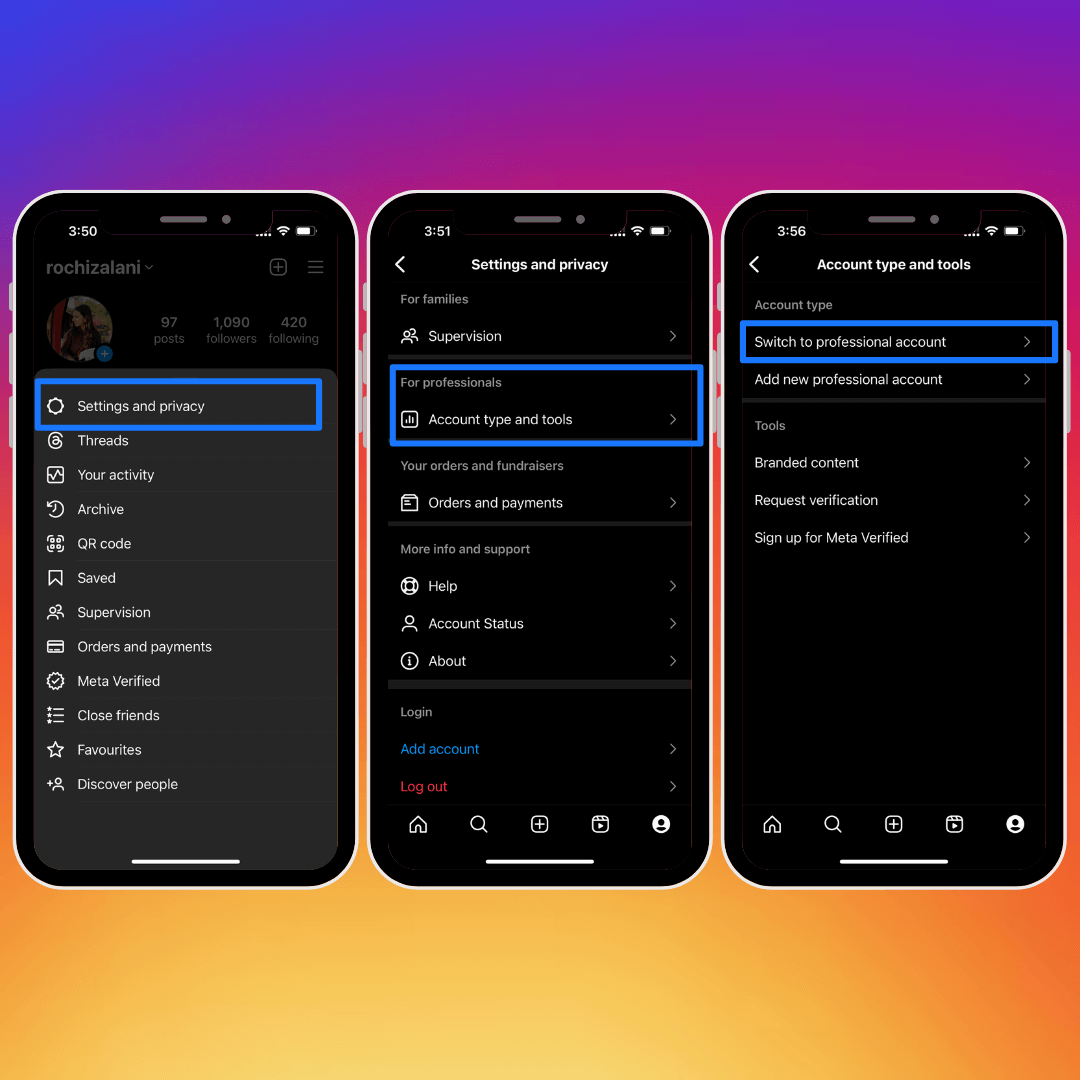
Note: You can also add a new professional account if you want to use Instagram for both personal and professional purposes.
2: A Facebook Page
There are two ways to run ads on Instagram: Boost your existing organic posts or go to the Facebook ads manager and host ad campaigns.
For the former, you may not need a Facebook account. But you need to create a Facebook page and link it to your Instagram account to use the Meta Ads Manager. Some regions also require an integrated Facebook page regardless of whether you want to boost an existing post or use the ads manager, according to Instagram.
To link your Instagram account to your Facebook page, follow these steps:
1. Log in to your Facebook ads manager and go to “Business settings.”
2. Click on “Instagram accounts” under “Accounts.”
3. You’ll be redirected to log in to Instagram and connect your professional account.
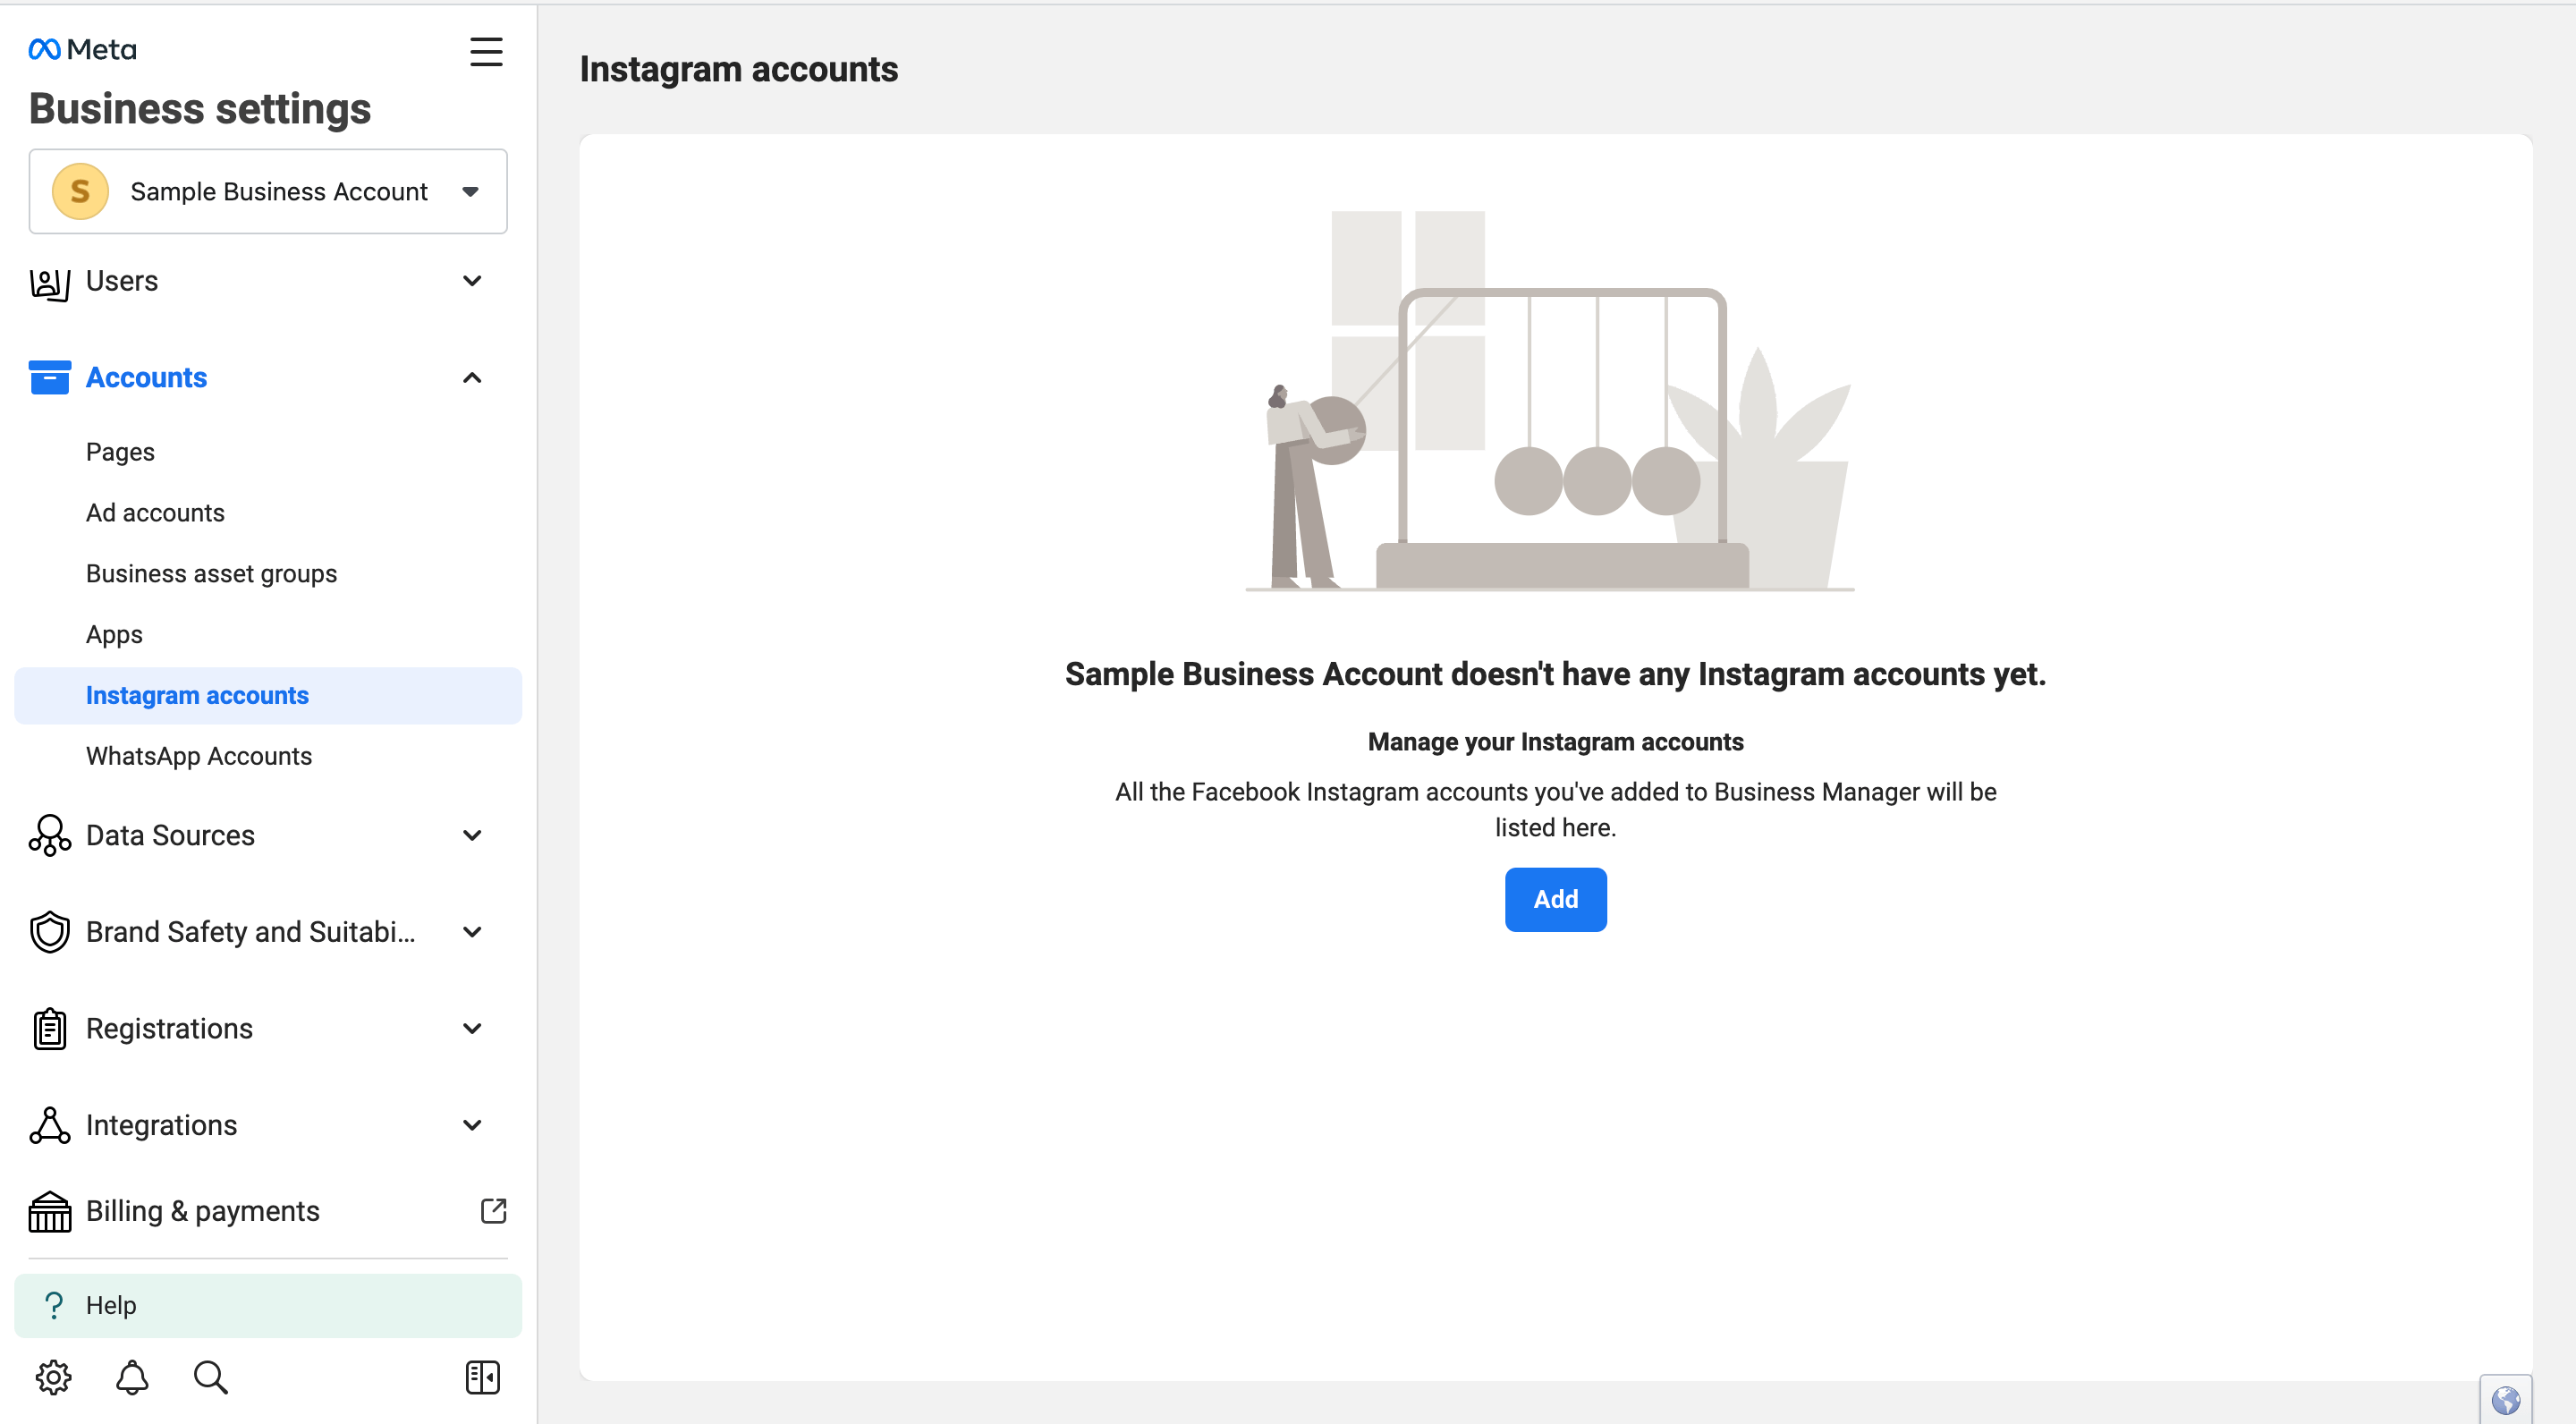
⚠️ Note: You can only link one Instagram account to a Facebook page.
3: A payment method
You need a payment method on file to create ads via the Facebook ad manager. You can add a card or fill in bank details while running ads, or you can do so proactively by going to “Billing and Payments” in the Facebook ads manager.
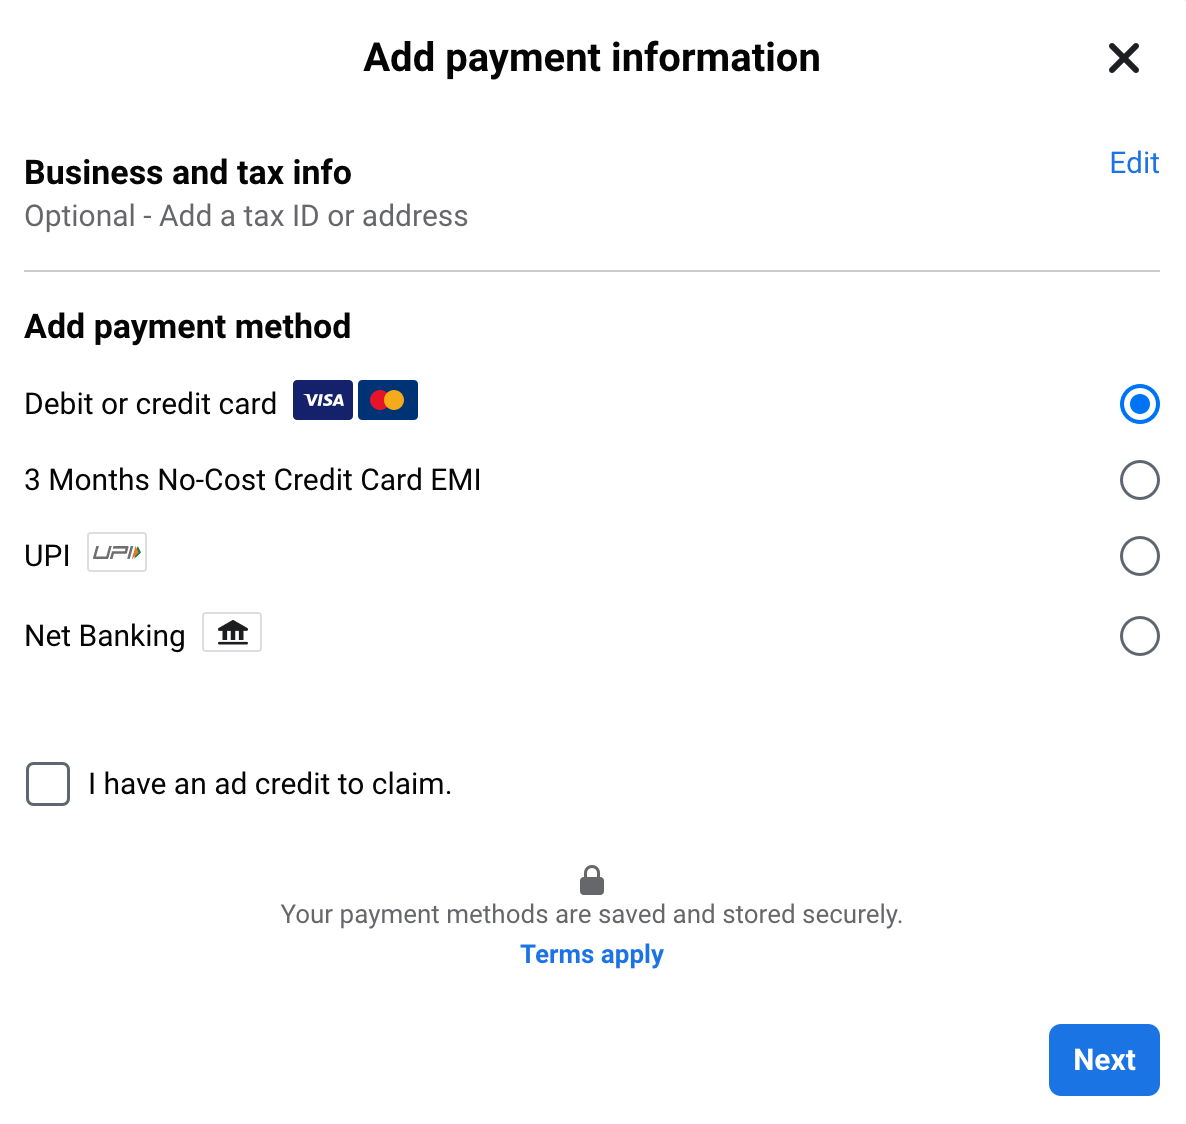
This help article from Meta will help you determine which payment modes are acceptable in your region.
How to run Instagram ads by boosting your existing Instagram post(s)
You get the option to “Boost” a post for your existing content on your Instagram business account.
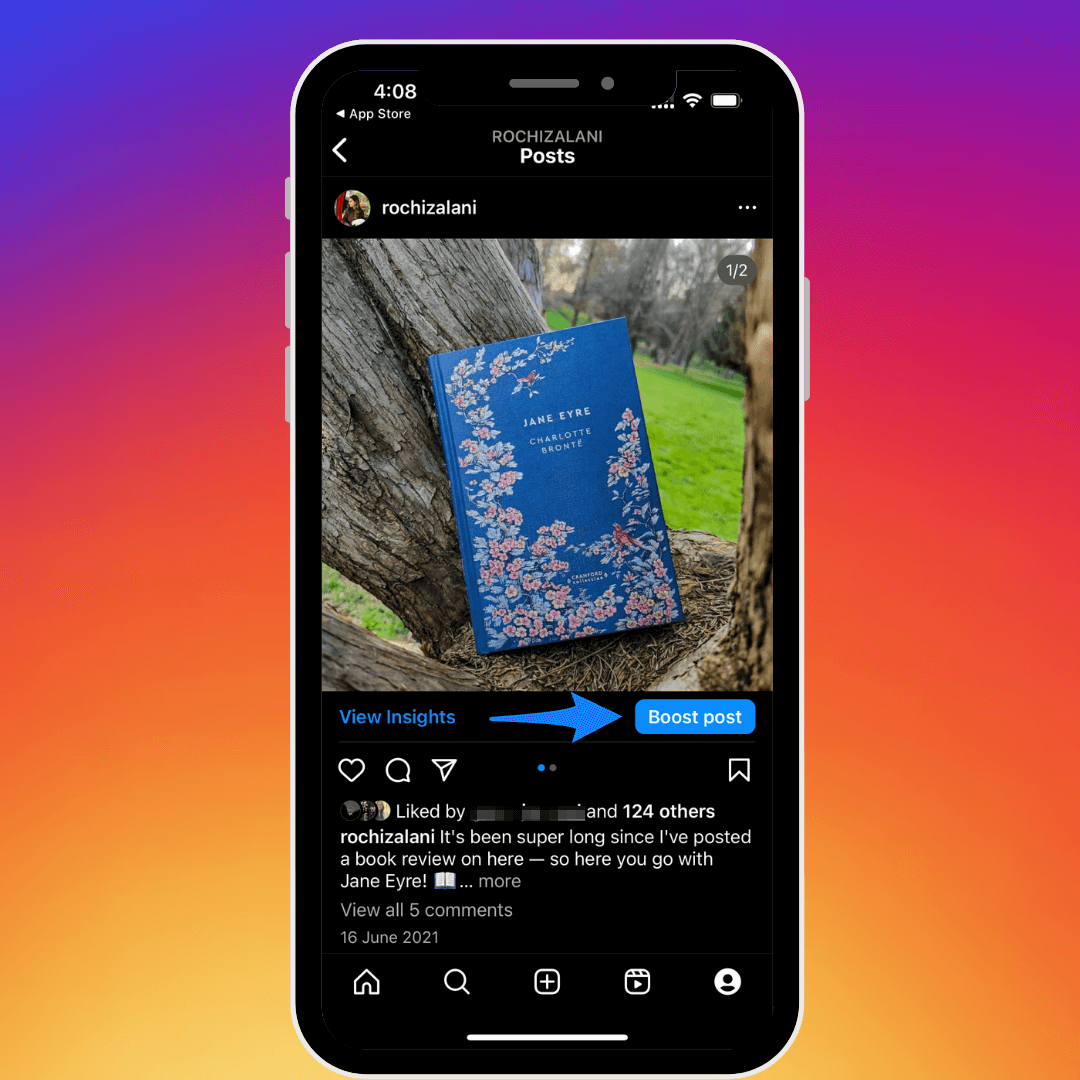
Once you click on the “Boost post” option, you’re required to:
1. Set a goal (what results you’d like from your ad)
2. Decide the audience demographics you’d like to reach with your ad
3. Determine the daily budget of your ad
4. Set a duration for how long you’d like to run the ad
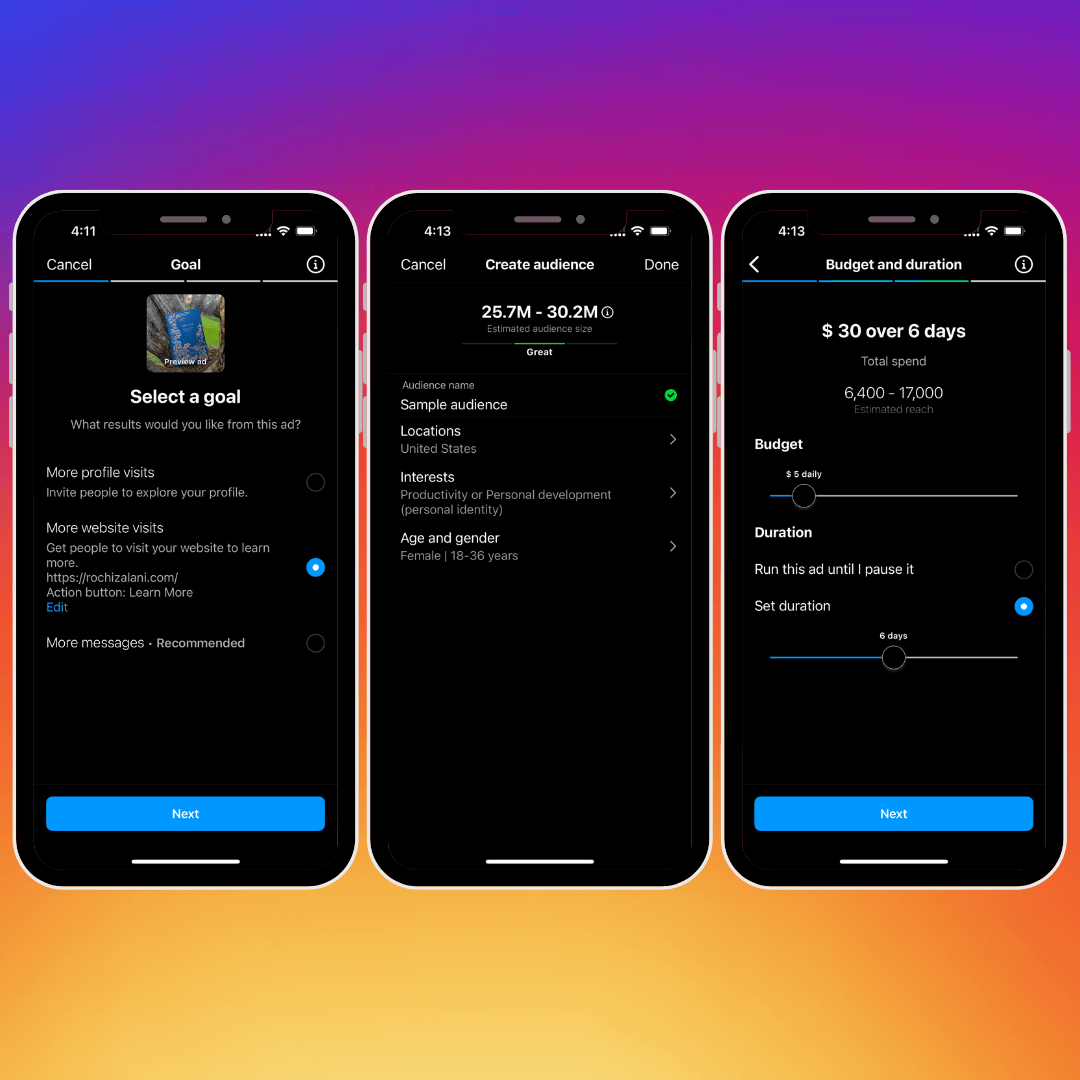
The benefit of boosting a post (vs. creating an ad from scratch in the ad manager) is:
- The process is quick
- You don’t have to link a Facebook page (there’s an option to skip this step)
- You don’t have to create a Facebook ad account
The disadvantage of running ads via boosted posts is you don’t get the refined targeting options, the functionalities aren’t as granular, and the well-laid-out structure of an ad campaign is missing. As a result, your ad performance might be negatively affected.
I’d recommend boosting your Instagram posts when:
- You’re a beginner and want to test how Instagram ads work at the surface level.
- The content you’ve shared has gone viral. It’ll help you capitalize on the momentum fast.
- You’re mixing and matching between boosted posts and ads from the Meta ads manager to monitor what performs best for you.
How to run Instagram ads using Facebook ads manager in 5 steps
If you’ve already run ads on Facebook using the Meta ads manager, you’re in luck! Instagram ads operate under the same roof, and the steps are similar to those you follow for Facebook.
But if you haven’t used the Meta ads manager already, don’t worry. When I first opened the Meta ads manager, it was like stepping into an alien world. Where should I click? How do I create ads? Which options should I choose? I had so many questions. Luckily, I’ve played around and researched enough to know my way around the maze. Here’s a step-by-step guide on how you can run Instagram ad campaigns using the Meta ads manager:
Step 1: Create an ad account and add your team
You need to create an ad account in Meta Business Suite to access the ad manager. Here’s how:
1. Go to “Business Settings” after you’ve logged in to your Meta Business Suite.
2. Click on “Ad Account” under the “Accounts” header.
3. You can claim an existing ad account using the ad account’s ID or create a new ad account by giving it a name and entering your region’s currency.
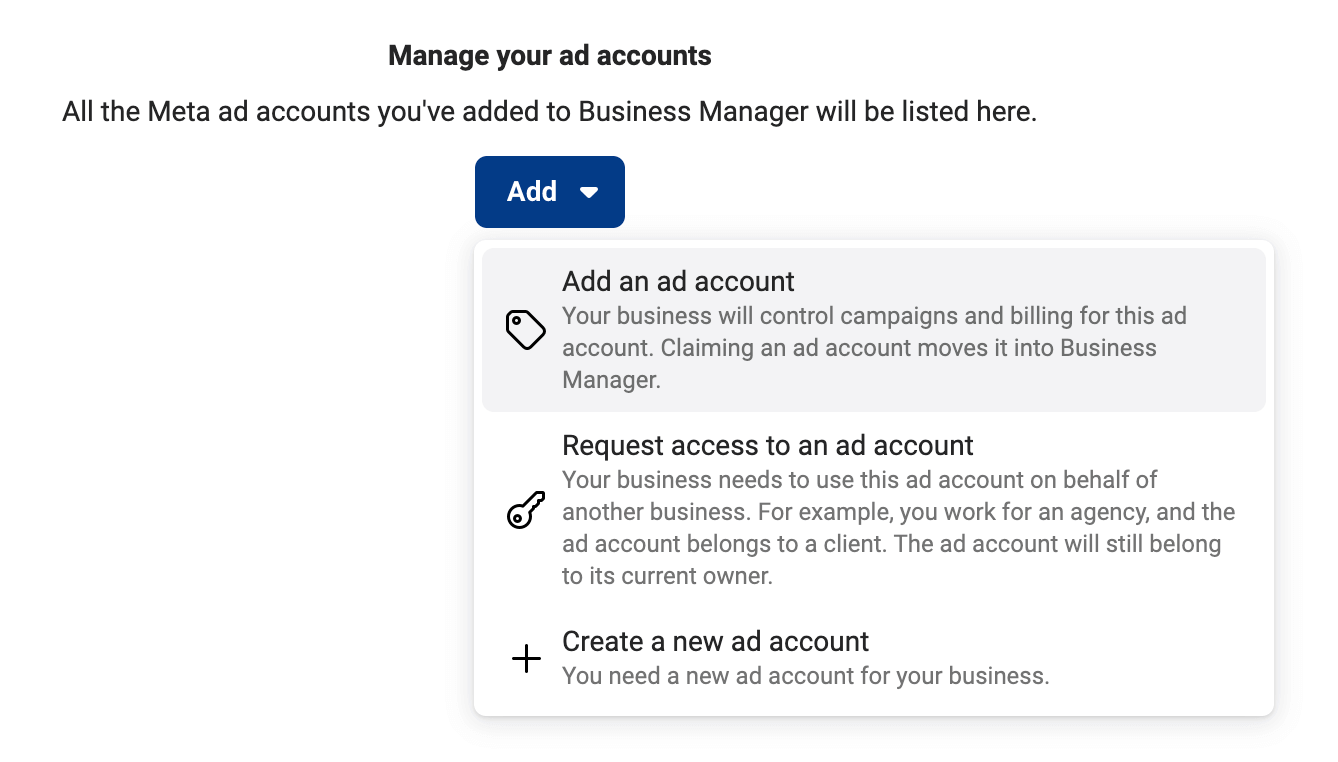
If you’re working with a team, go to “Ad account settings” in your ad manager and find “Ad account roles.” You can offer your members three kinds of access:
- Admins have the same permission as the ad account’s owner. They can create ads, edit payment methods, and modify the access levels of other team members.
- Advertisers can create ads, edit campaigns, and access performance reports. But they can’t modify existing permission settings or your payment methods.
- Analysts can only view ads and access performance reports.
Step 2: Design an Instagram campaign
Meta has three levels for your Instagram ad account.
- Level one is the campaign. It’s the bigger picture of what kind of campaign you’re going to run.
- Level two is the ad sets. It’s about your target audience and the frequency you’ll advertise to them.
- Level three is the executed ad. It’s what your prospective buyers see on their mobile app.
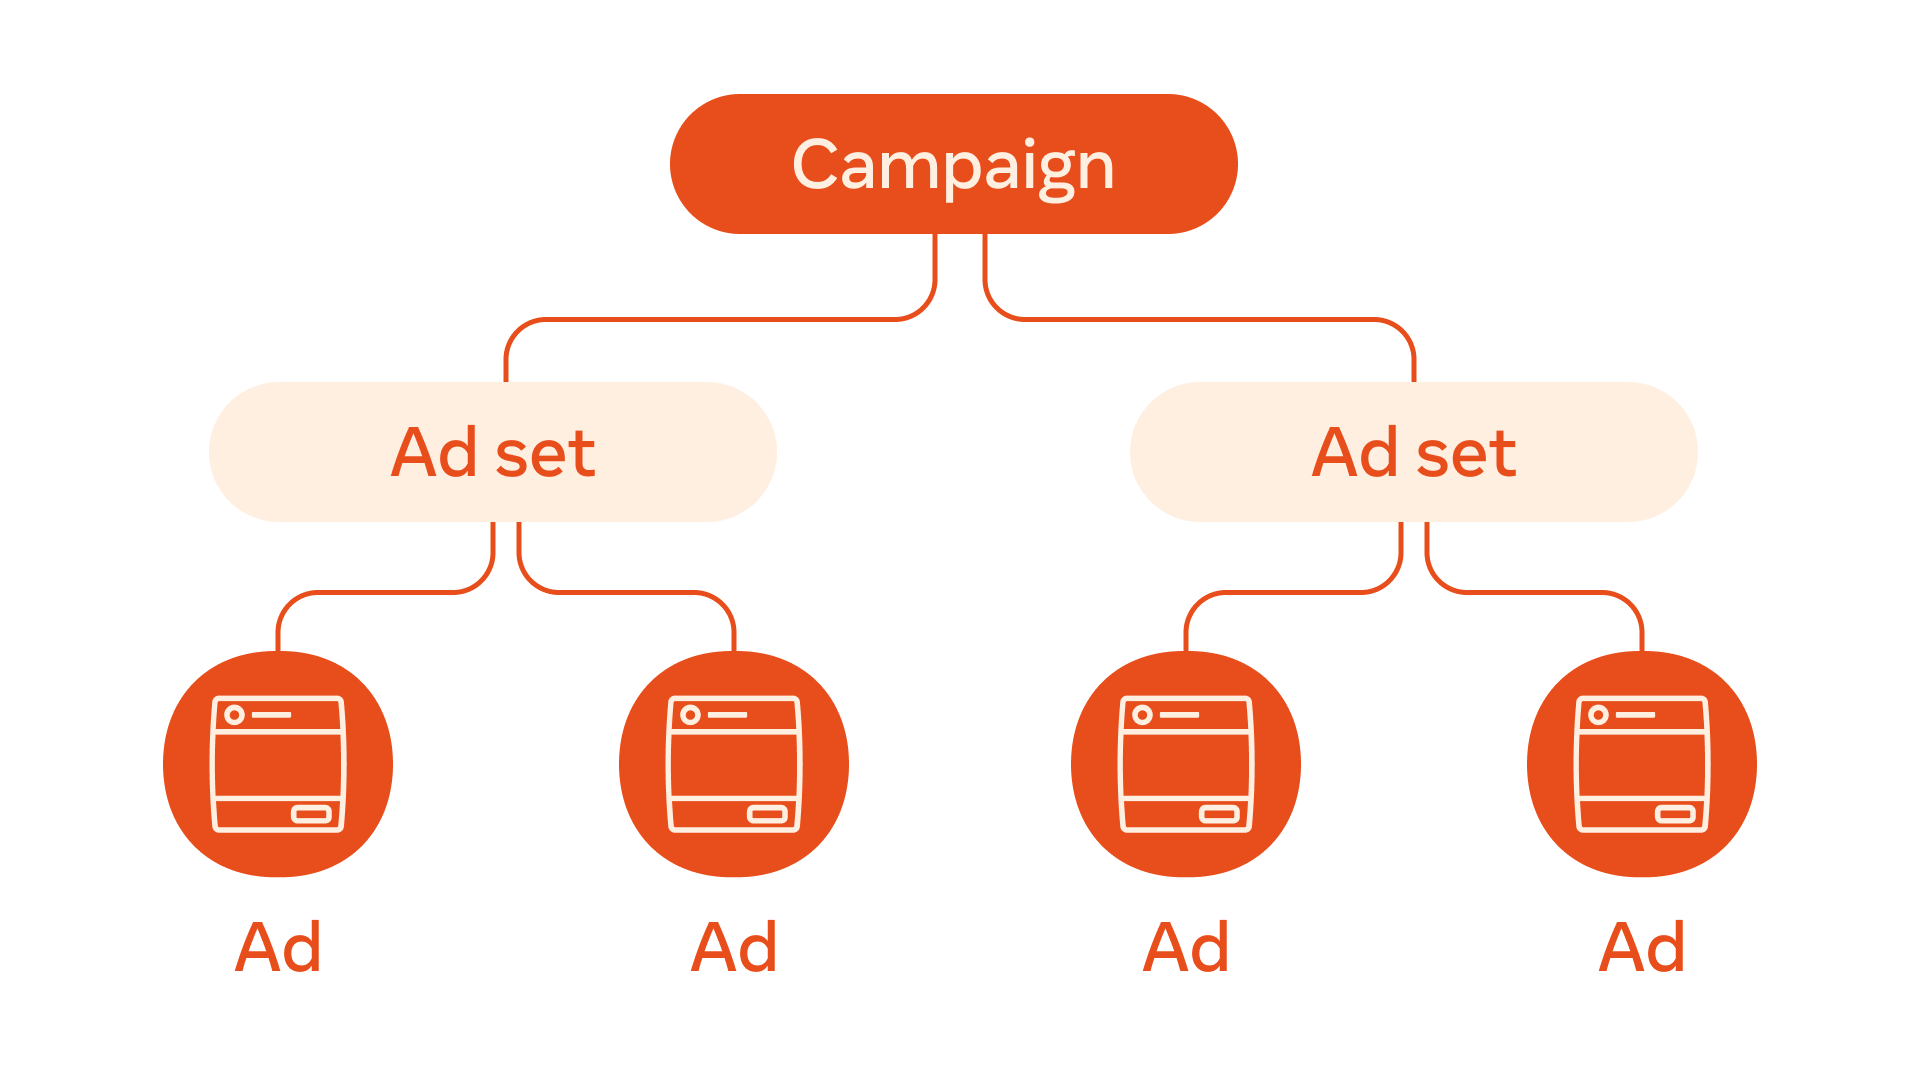
The first step (which this section is about) is the campaign level. Here, you have to choose what action you want your target audience to take after seeing your ad. It’s called the “objective” of your ad campaign.
For example, suppose your goal is to increase brand awareness using Instagram ads. In that case, your objective is to improve the engagement rate of your ad so more and more people are redirected to your website or Instagram account.
You can find the “Create” option to start your campaign at the top left corner of the ads manager.
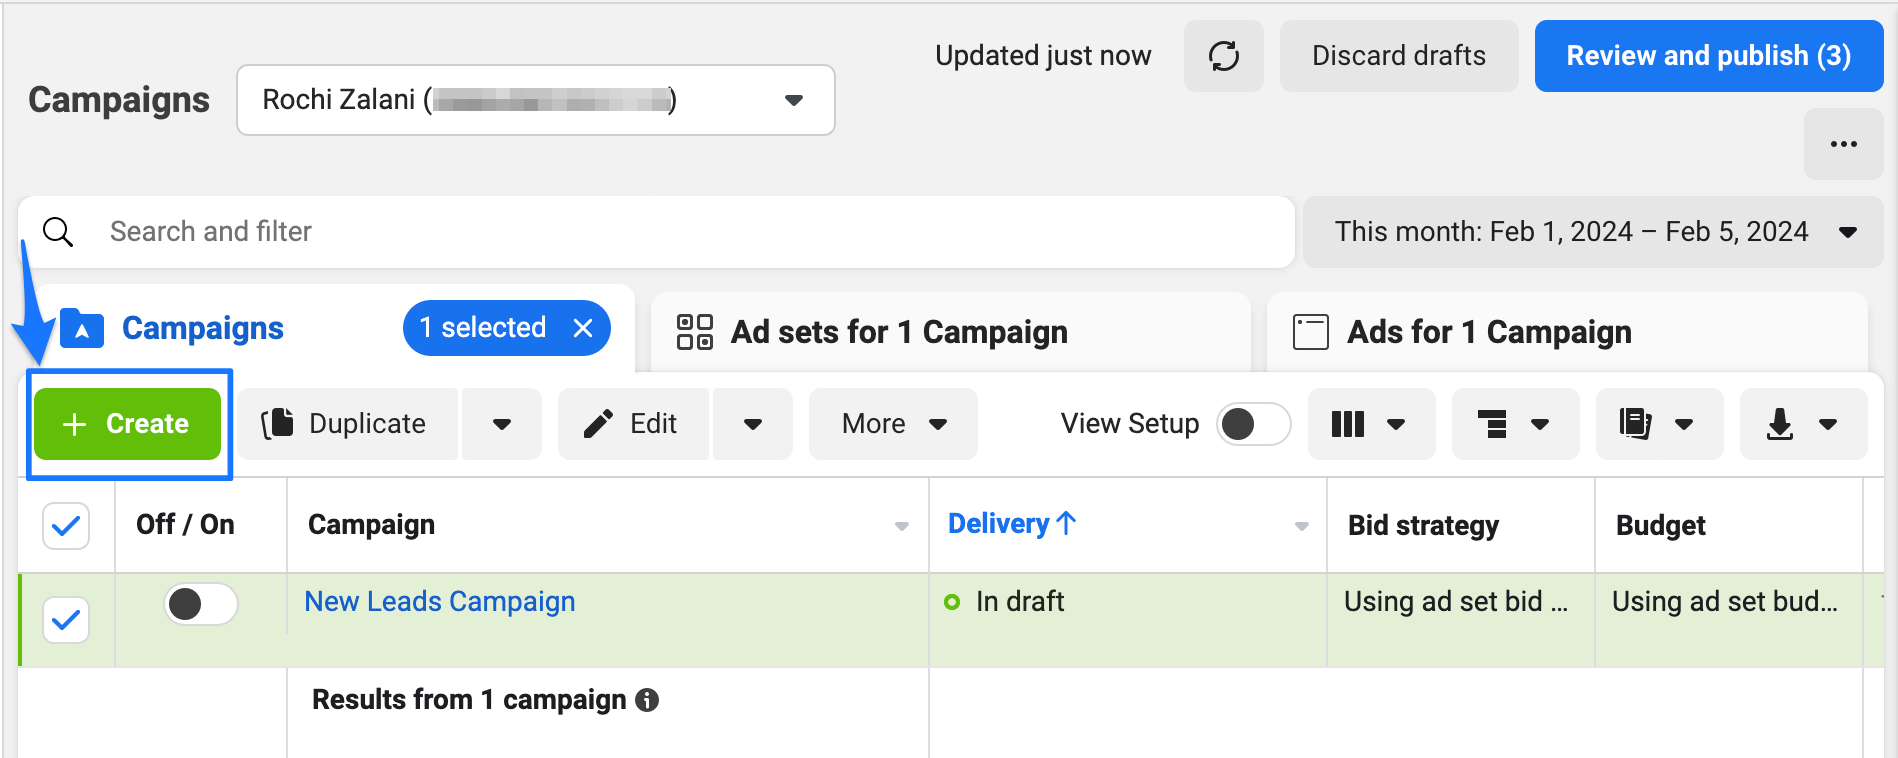
Once you click on that, Meta gives you six objective options:
- Awareness: Choose this option when your goal is to increase brand awareness about your product or service.
- Traffic: Choose this option when you aim to boost traffic on your website.
- Engagement: Choose this option when you want to build a community using Instagram.
- App promotion: Choose this option when you want to promote your company’s app and boost app installs.
Sales: Choose this option when you want to use ads for lead generation.
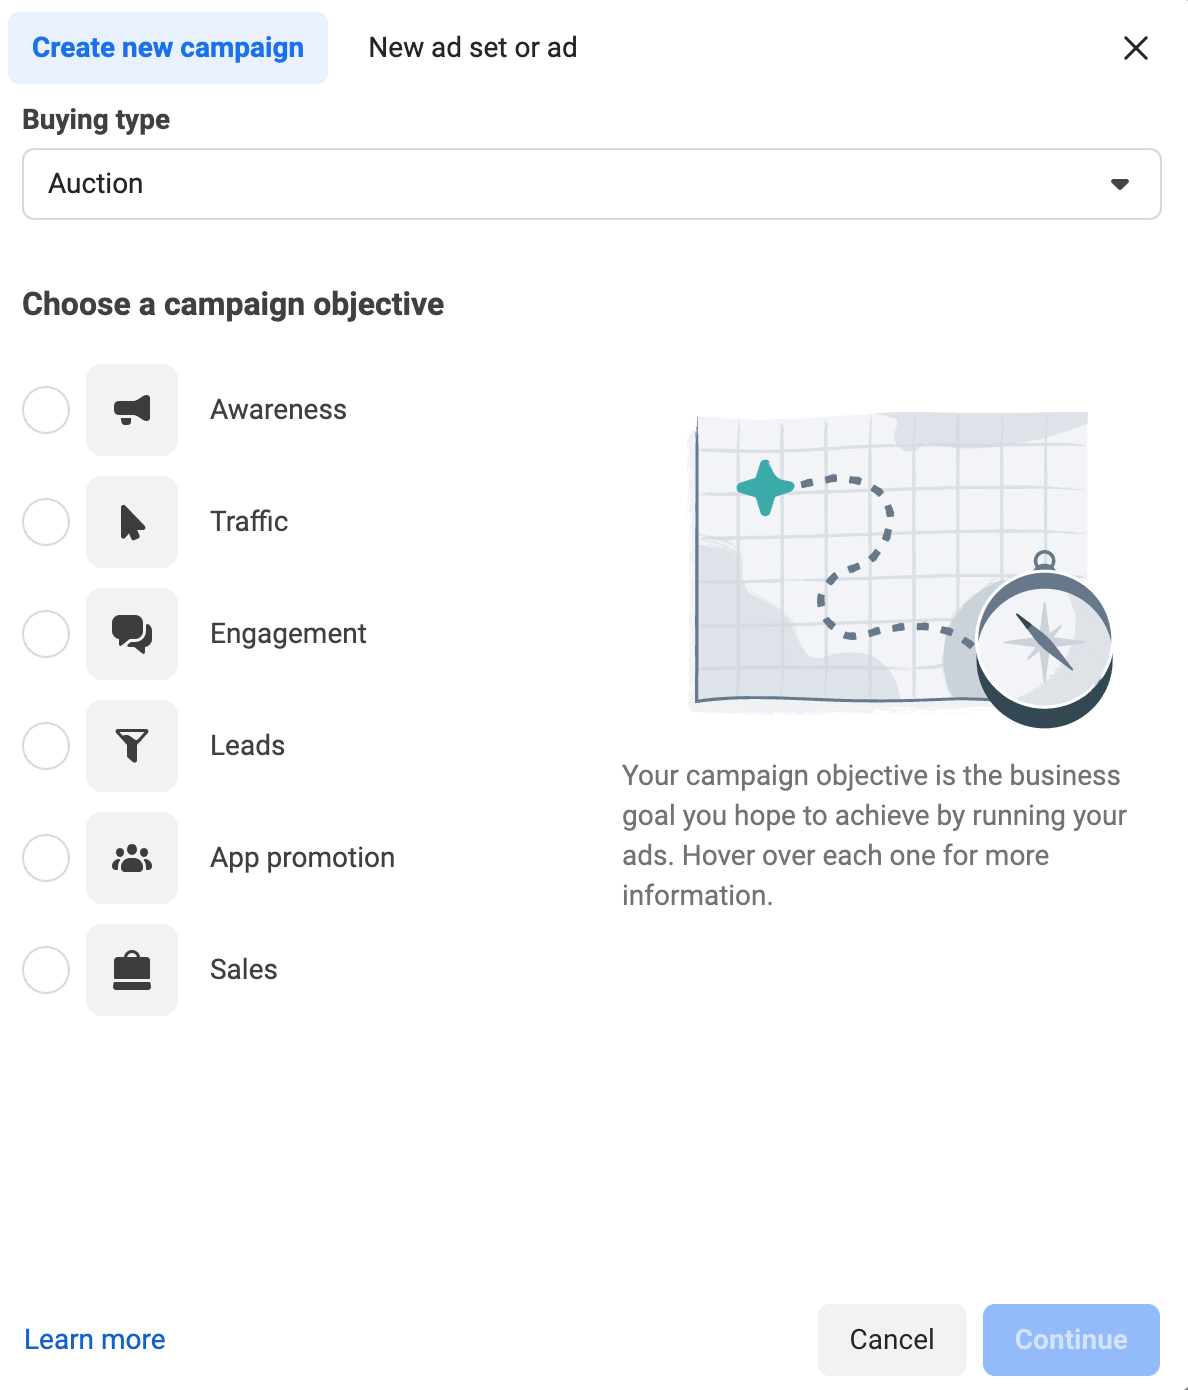
⚠️ Note: Instagram has modified its objectives before and might do so again. But the primary objectives remain the same — even if their name is changed. For example, before, there were eleven objectives in Meta’s ad manager, and then they were merged into six. However, the core objectives like Awareness, Engagement, and Sales remain unchanged.
After you choose an objective, you’ll be asked whether you want to create a campaign using Meta’s recommended settings or if you want to do everything manually.
If you’re a beginner, follow Meta’s suggestions. It’ll help you streamline your campaign and move things along faster. Plus, it’s all editable, so you can always go back and modify the settings however you like.
The last step for creating a campaign is turning on the A/B testing if you want to experiment with different images, copy, and target audiences.
You should also turn on the “advantage campaign budget” button to optimize your ad sets. Let’s say you create two ads within a campaign, and one is performing significantly better than the other. If your advantage campaign budget setting is on, Meta will automatically redirect your ad budget to the successful ad set.
⚠️ Note: If your ad falls into the credit, employment, housing, social issues, elections, or politics category, you need to let Meta know by selecting that in the “Special ad category” option on your campaign. Meta can block your ad account if you don’t disclose this information upfront.
Step 3: Create ad set(s) for your campaign
The next level is creating ad sets within your campaign. What options you see for ad sets depends on your campaign objective. If you’ve selected “Sales” as your objective, you’ll see different conversion locations than if you had chosen the “Engagement” objective.
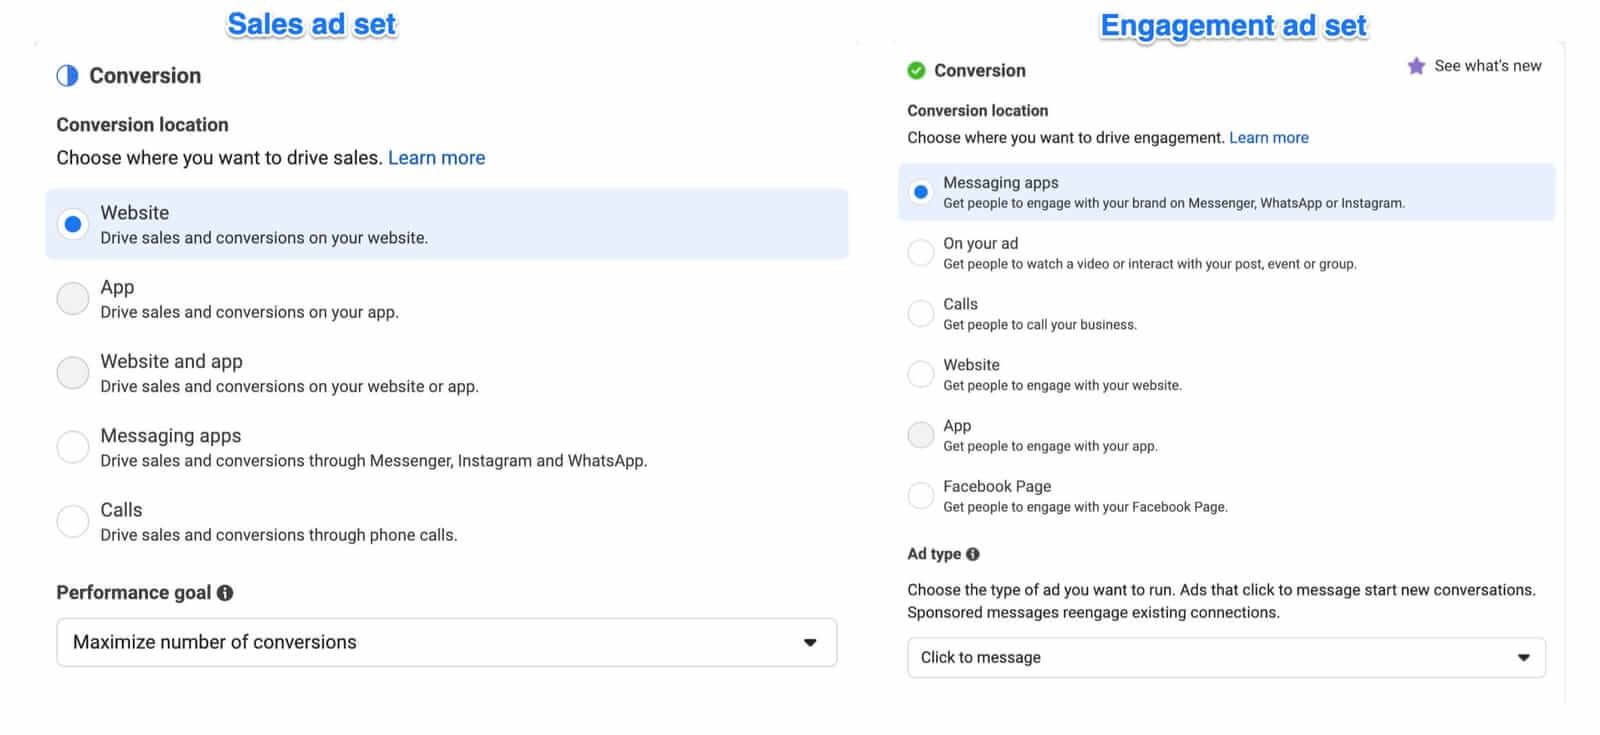
The “conversion location” and “performance goal” decide the type of call-to-action button (CTA) you choose. For example, if you want to redirect people to your website, select “Website” as the conversion location and “maximize number of conversions” as the performance goal.
⚠️ Note: To track your ad performance accurately, you need to install Meta Pixel to your ad account using the Meta Events Manager. Facebook Pixel (same as Meta Pixel) is a piece of code you need to add to your company’s website to measure precise ad results and optimize targeted audiences.
After selecting your conversion location, the next step is deciding your ad budget and schedule. You can decide when your ads start (and when they end/stop running, if you need to) and allocate a daily or lifetime budget to those ads.
Post the budgeting and scheduling options, you need to decide the audience you want to target for your ads. Meta allows you to choose custom locations, demographics, interests, and behaviors of your ideal target audience.
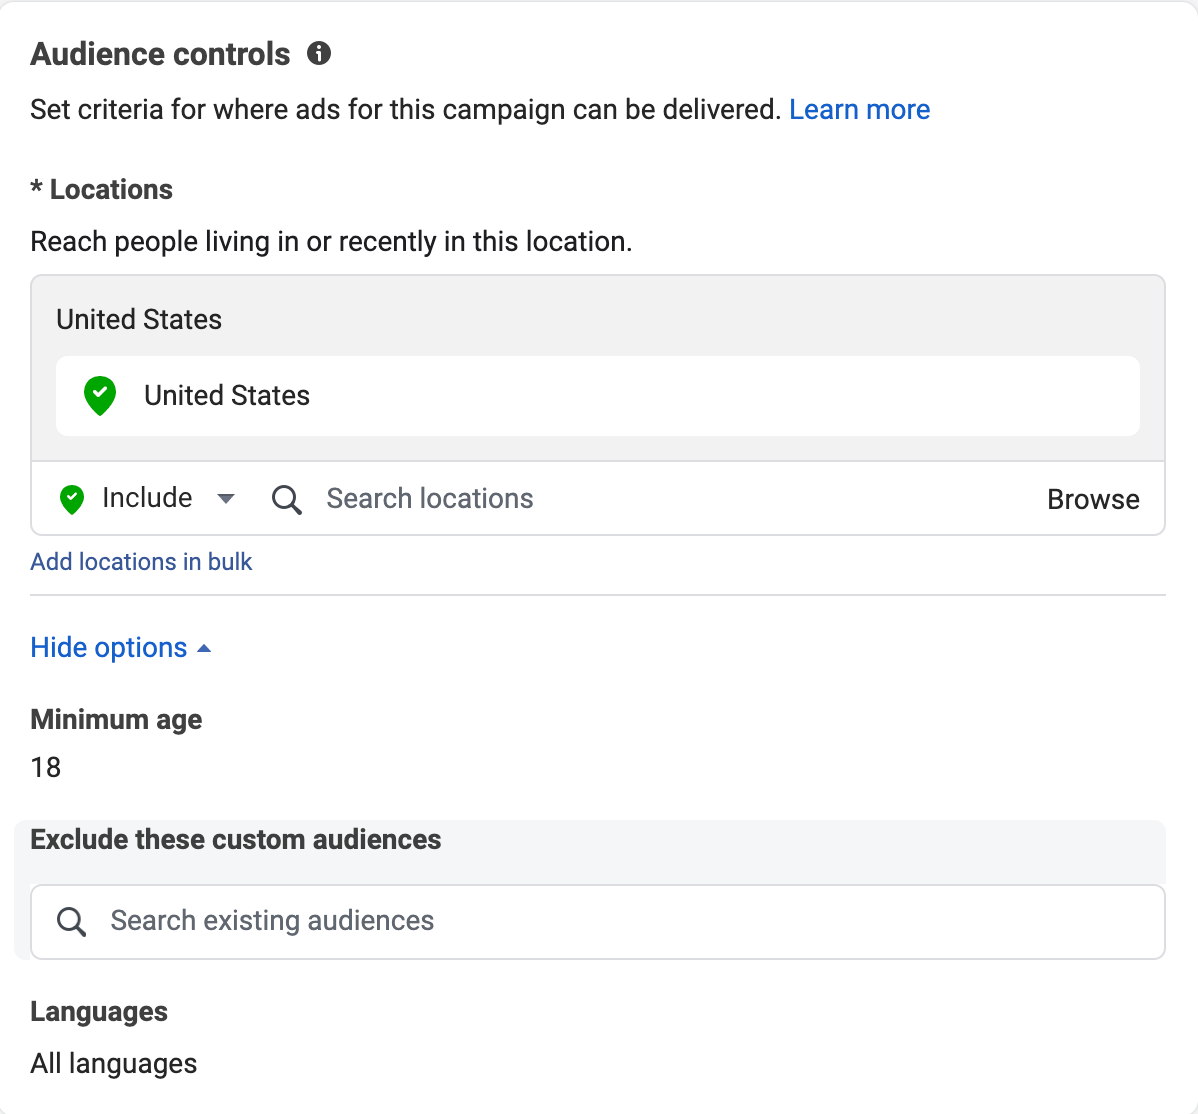
While all of these are new audiences, in the “Audience” settings of your Meta ad account, you can also further define your audience particulars like:
- Custom audiences are people who’ve already shown an interest in your product or service. Meta Pixel helps Instagram determine which Instagram user has already visited your website, for example. Meta ads manager will use this info to show your product’s ads to the user.
- Lookalike audiences are people with overlapping demographics and interests as your target audience. You can also choose these audiences from the Meta Pixel you’ve set up in the step before.
Saved audiences are the settings you’ve already used in ad campaigns in the past (enabled after you’ve run a few ads and saved audience data in Meta).
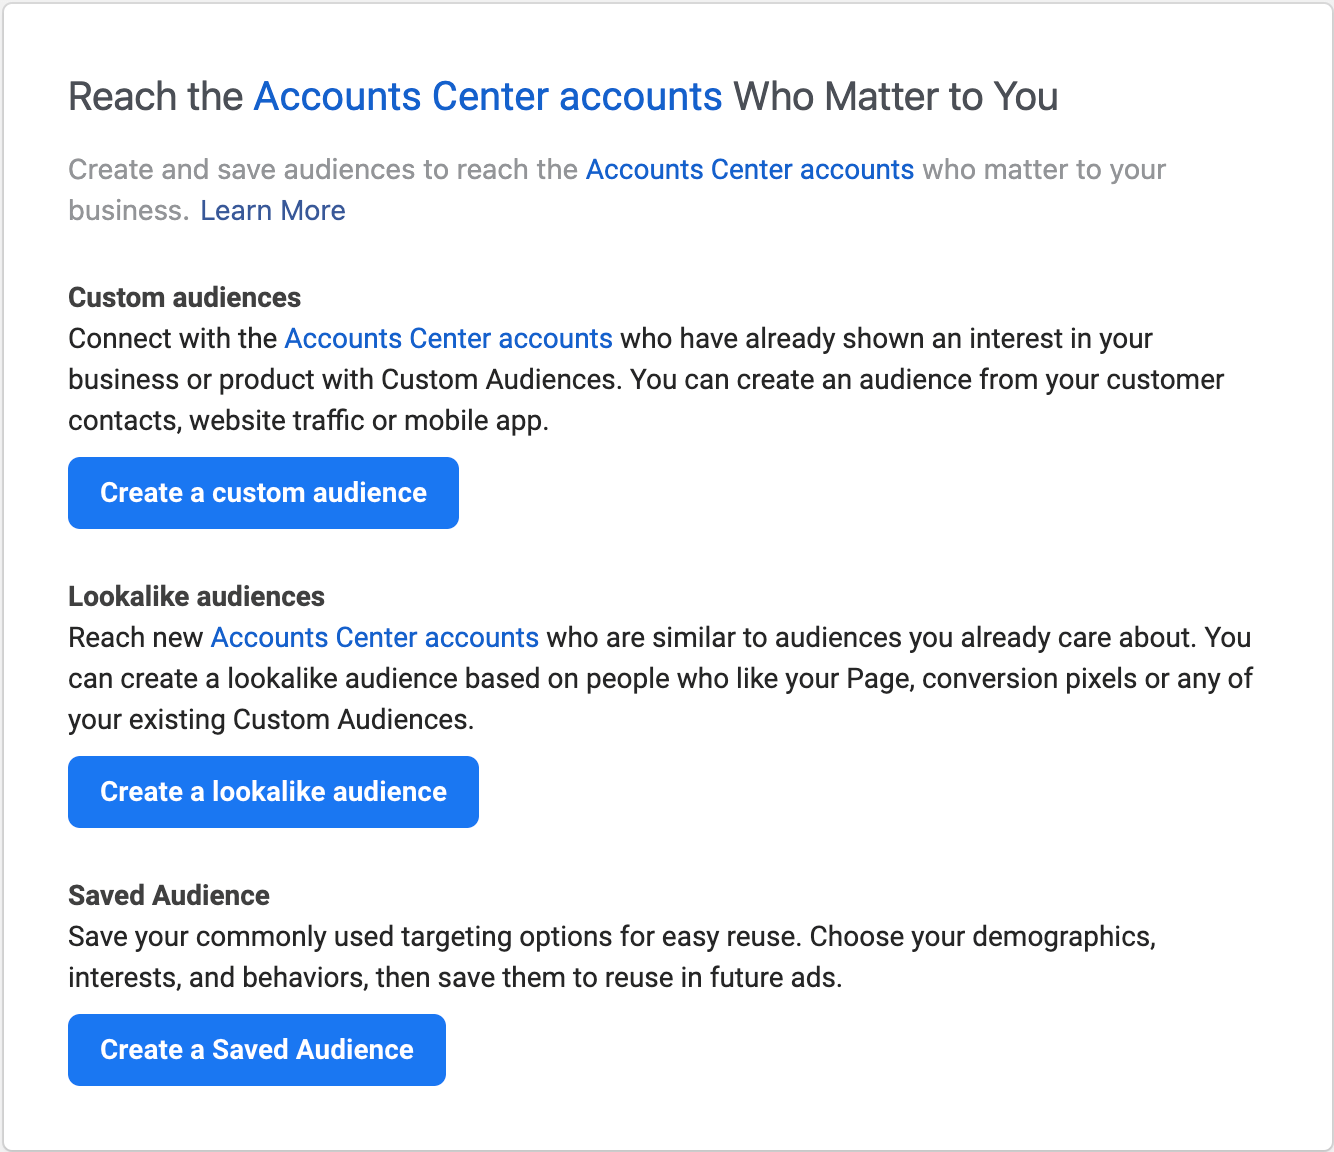
While creating ad sets, you should keep your target options broad to cast the net wide. Meta helps you verify the audience definition’s breadth when zoning in on your potential customers’ demographics.
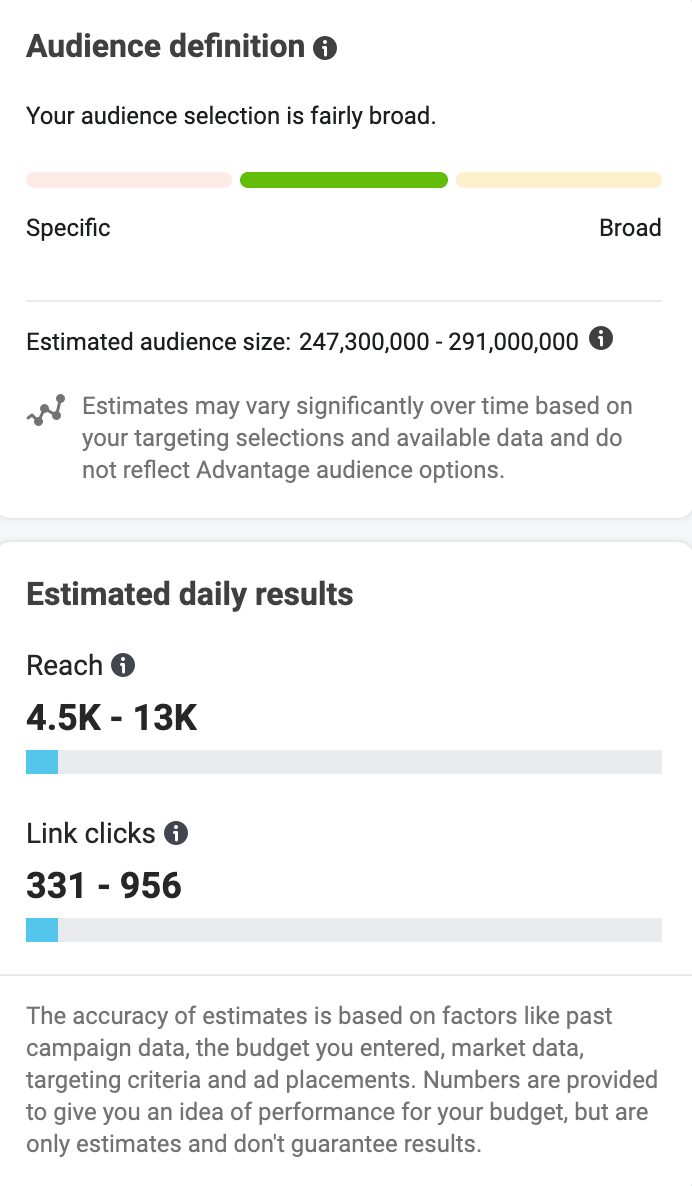
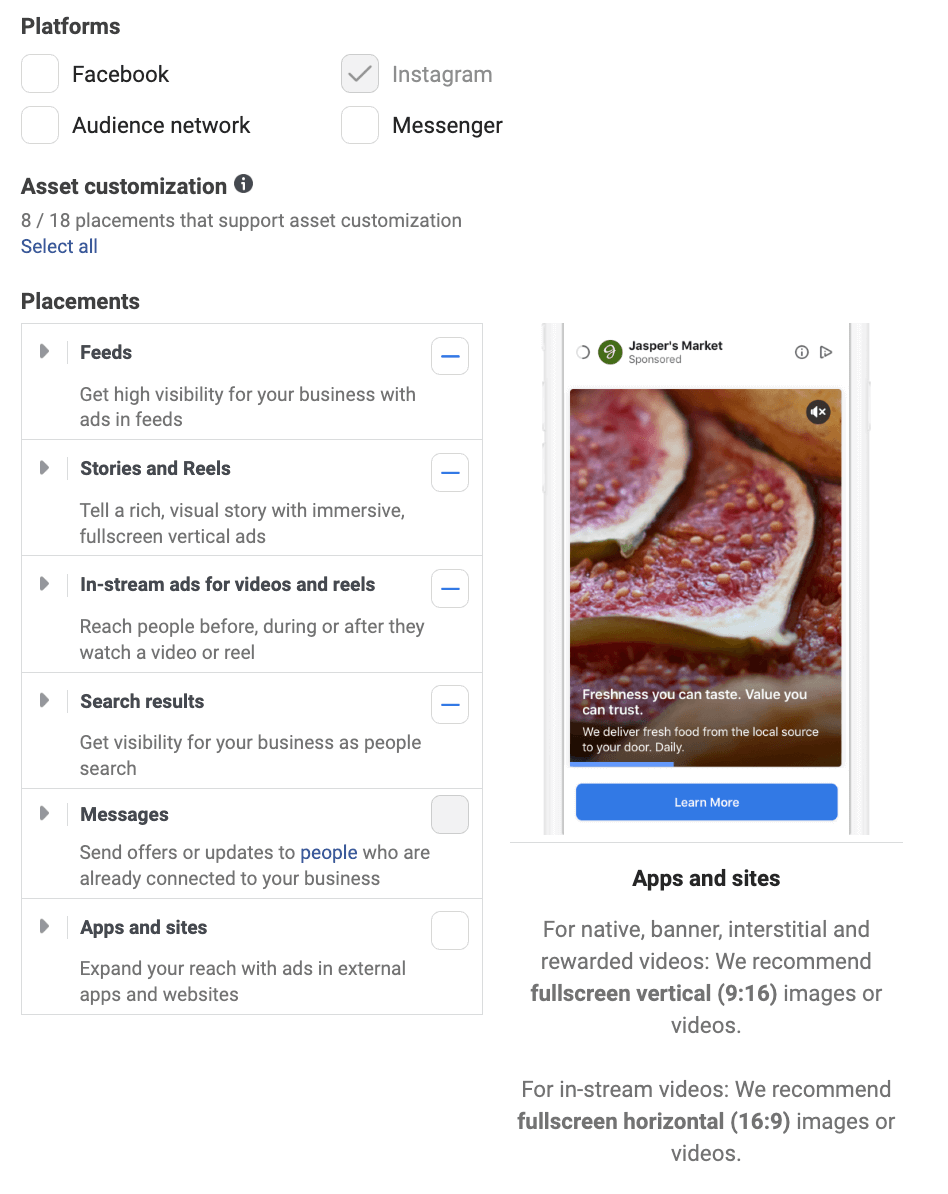
Lastly, there’s a similar “Advantage audience” and “Placements” option so Meta can recommend who you should target and how. (Ad placements are where you place your ads on Instagram — in Instagram feed, Story, Explore page, etc.) I’d advise following Meta’s suggestions and seeing how your ads perform. If the ROI is poor, you can go manual placements for the next time.
But remember, the Meta ads manager includes both Facebook and Instagram. Advantage Placement will assume you’re also okay running ads for your Facebook page, too. If you only want to run an Instagram campaign, select the “Manual placements” option. Instagram has seven places on its social media platform for ad placements:
- Instagram feed
- Instagram Stories
- Instagram Explore
- Instagram Reels
- Instagram search results
⚡ Remember: You can have multiple ad sets within the same campaign. For example, let’s say you’re running a sale on a product category. One of your ad sets can redirect people to product A, and another can lead them to product B. Both ad sets are part of the same Instagram ad campaign (the sale), but they carry different products.
Step 4: Craft your Instagram ad(s)
The last level is about getting your hands dirty and creating Instagram ads. Currently, you can create five types of Instagram ad formats. Below is a table laying out the type of ad, what it consists of, and when you should use it.
Remember, these are ad formats. In step three, we discussed ad placements. Ad formats are the type of ad (image, video, carousel, etc.) you create, and ad placement is where you decide to display it on Instagram (feed, Stories, Reels, Explore, etc.).
Your ad creative will look different depending on which combination you select. For example, carousel ads on Instagram Reels automatically convert to Instagram video ads — like a slideshow of all your images.
While creating your ad, you can also repurpose the visual media of your existing Instagram posts and write a compelling description, header, and copy. You also need to decide the destination of your ad at this step. What happens after people click on your ad? For example, they can be redirected to your website or the app store to download your app.
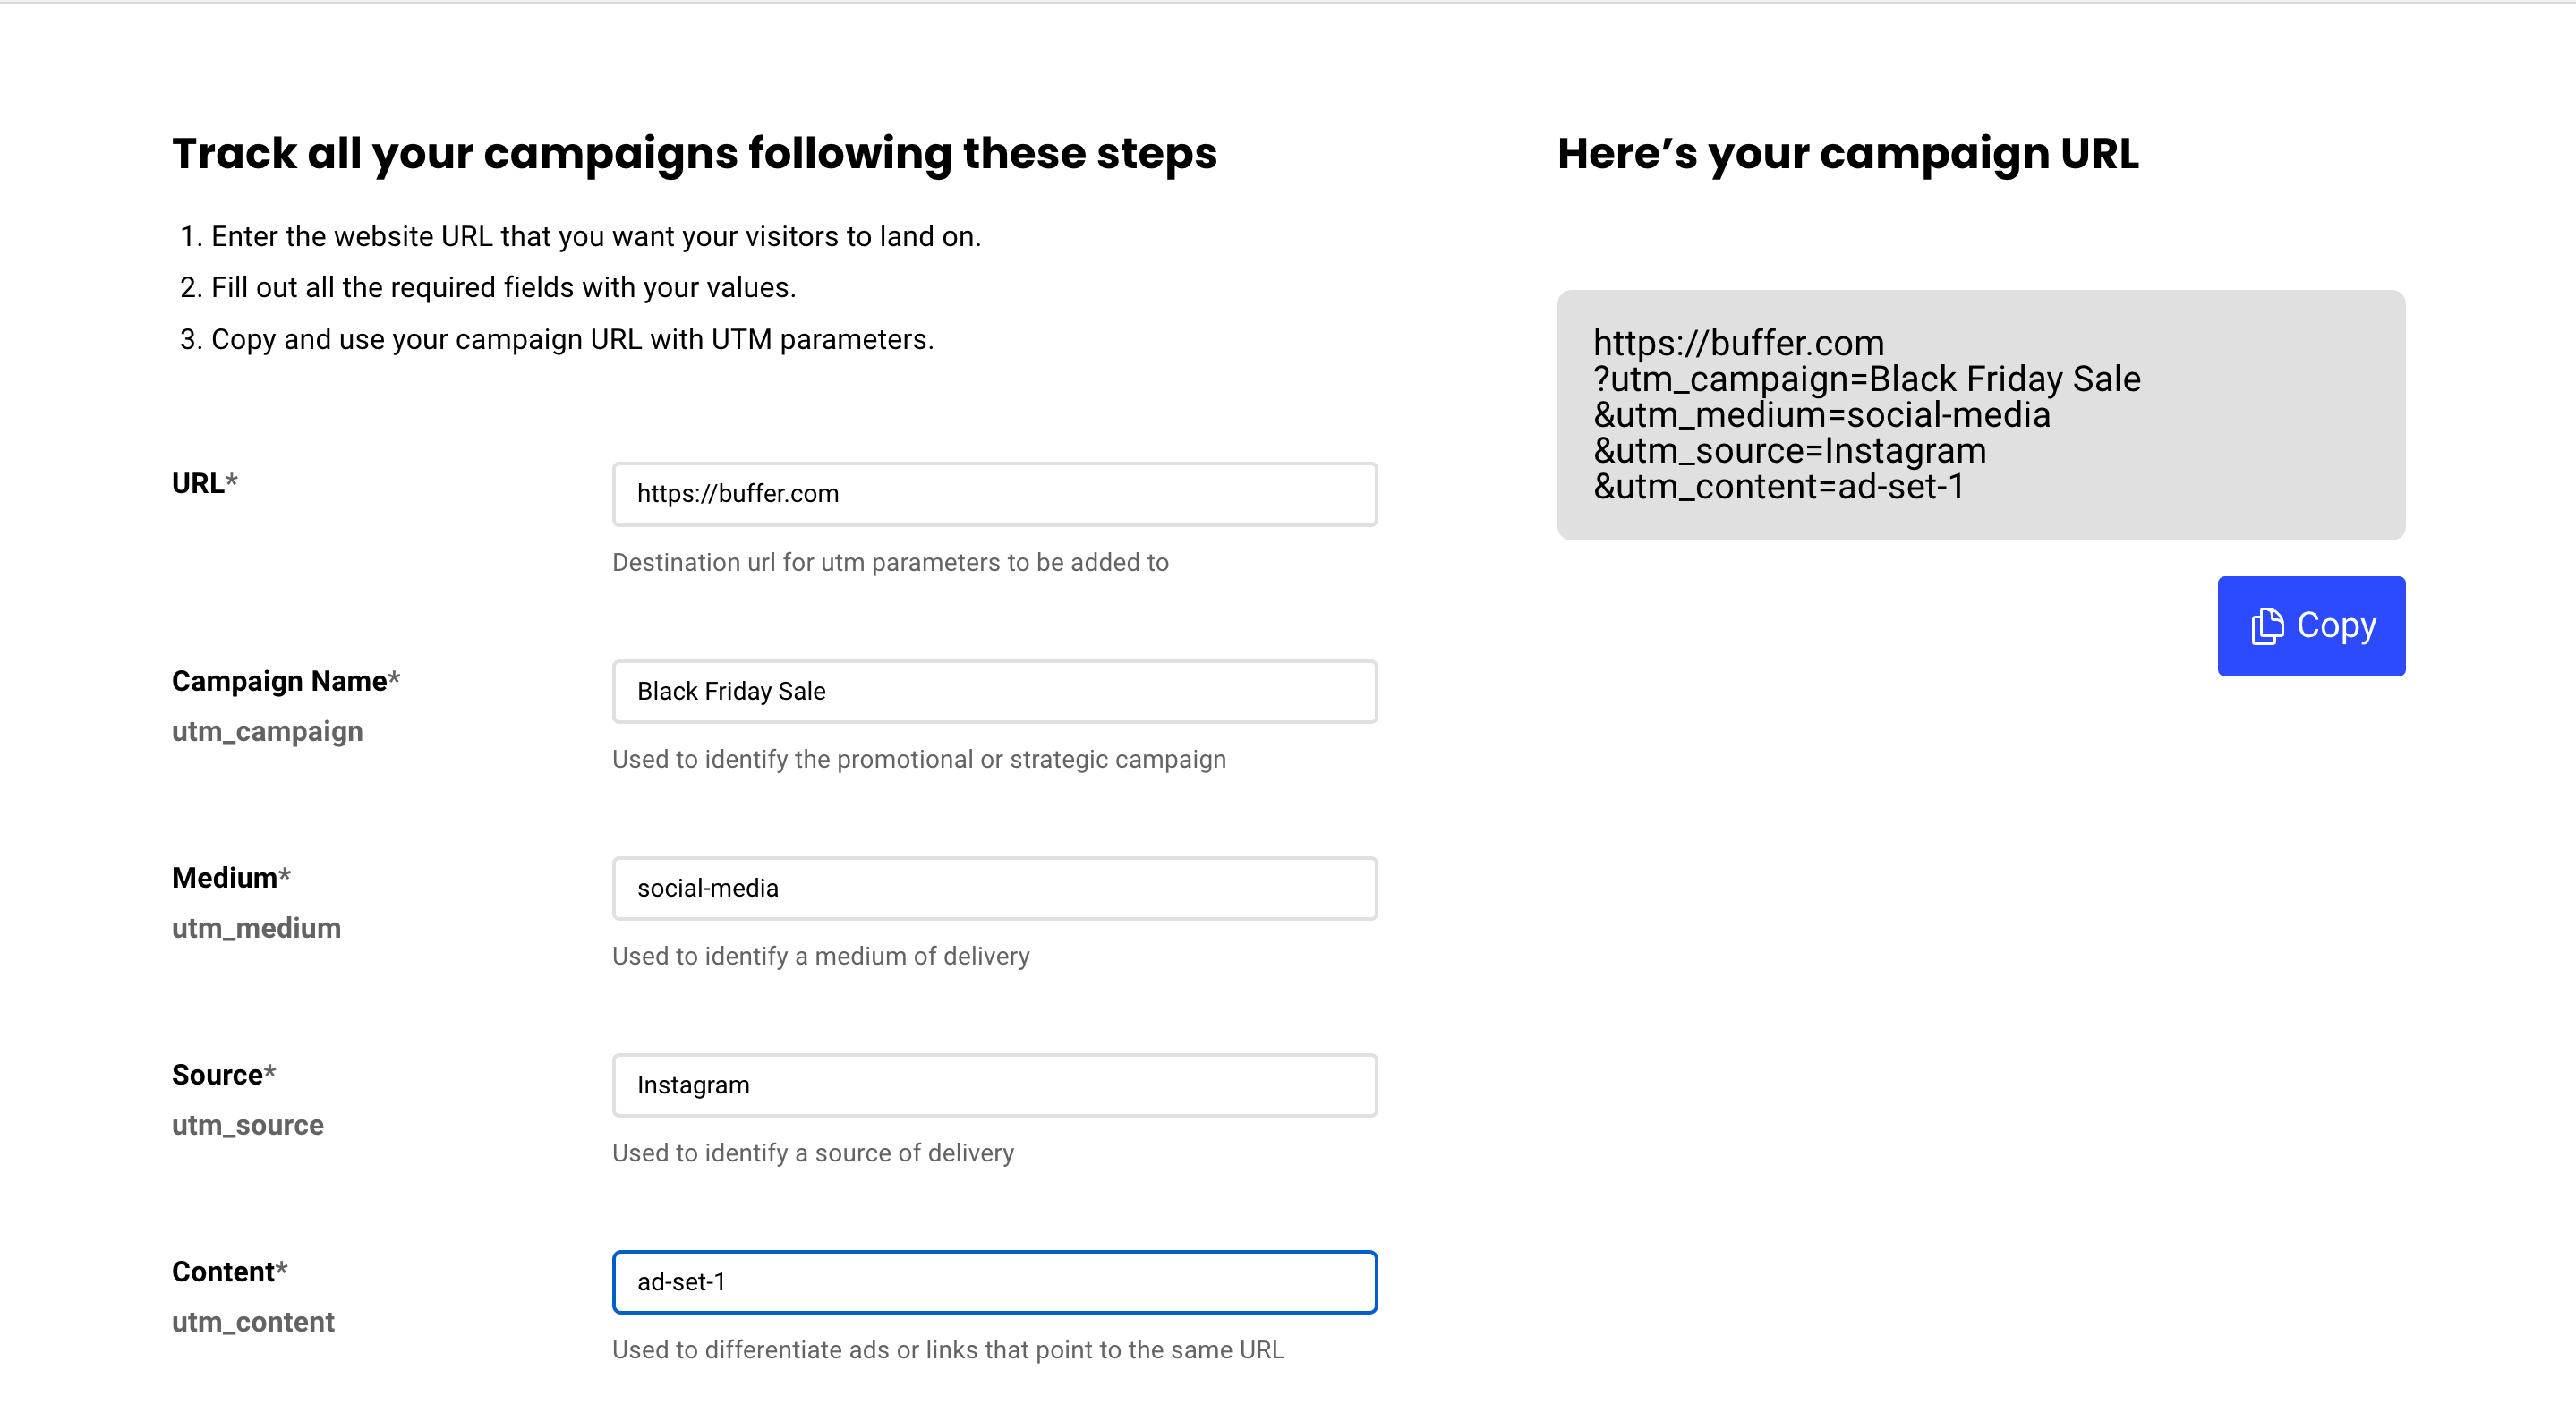
To track ad performance accurately, you’re also required to add a UTM parameter to the URL you’re adding as your destination. Buffer has a free UTM builder that can come in handy here.
Here are four best practices to keep in mind while you’re building your visual creative and copy for Instagram ads:
- Keep your ad copy clear, concise, and crisp — answer “what’s in it for me?” right away for potential customers and use copywriting formulas to your advantage
- Don’t bury the offer (like a discount code) in an ad’s caption. Highlight it in the pictures and videos clearly
- Ensure your ad preview looks eye-catching in all ad placements if you’re using the same creative
- Show real people using your product in ads to help people resonate with your brand
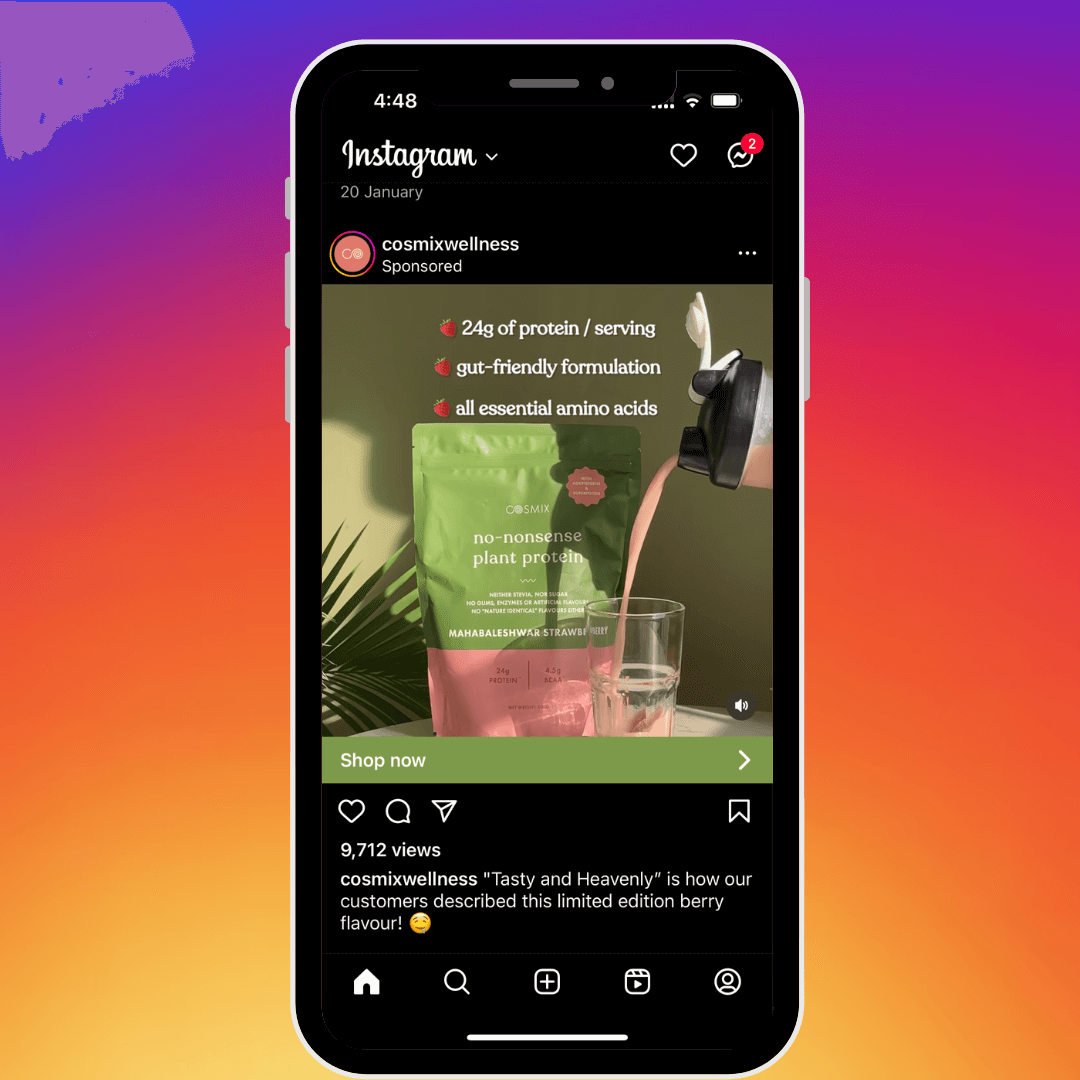
The below Instagram video ad by Cosmix Wellness nails its Instagram ad. It puts a spotlight on the product’s benefits, showcases how a real person uses it, and the caption creates urgency with the phrase “limited edition.”
Step 5: Track your ad performance and tweak your next ad armed with insights
The Facebook ad manager enables you to see performance data in the Overview tab. You can customize the duration for which you want to see ad insights and also filter data using various parameters. For example:
- You only want to monitor ad performance you landed on the Instagram Explore page. You can filter for this using search.
- You only want to see your ad's engagement metrics (post likes, comments, shares). You can customize this using columns.
You only want to track ads you published in the U.S. market. You can refine your ad manager dashboard using breakdown.
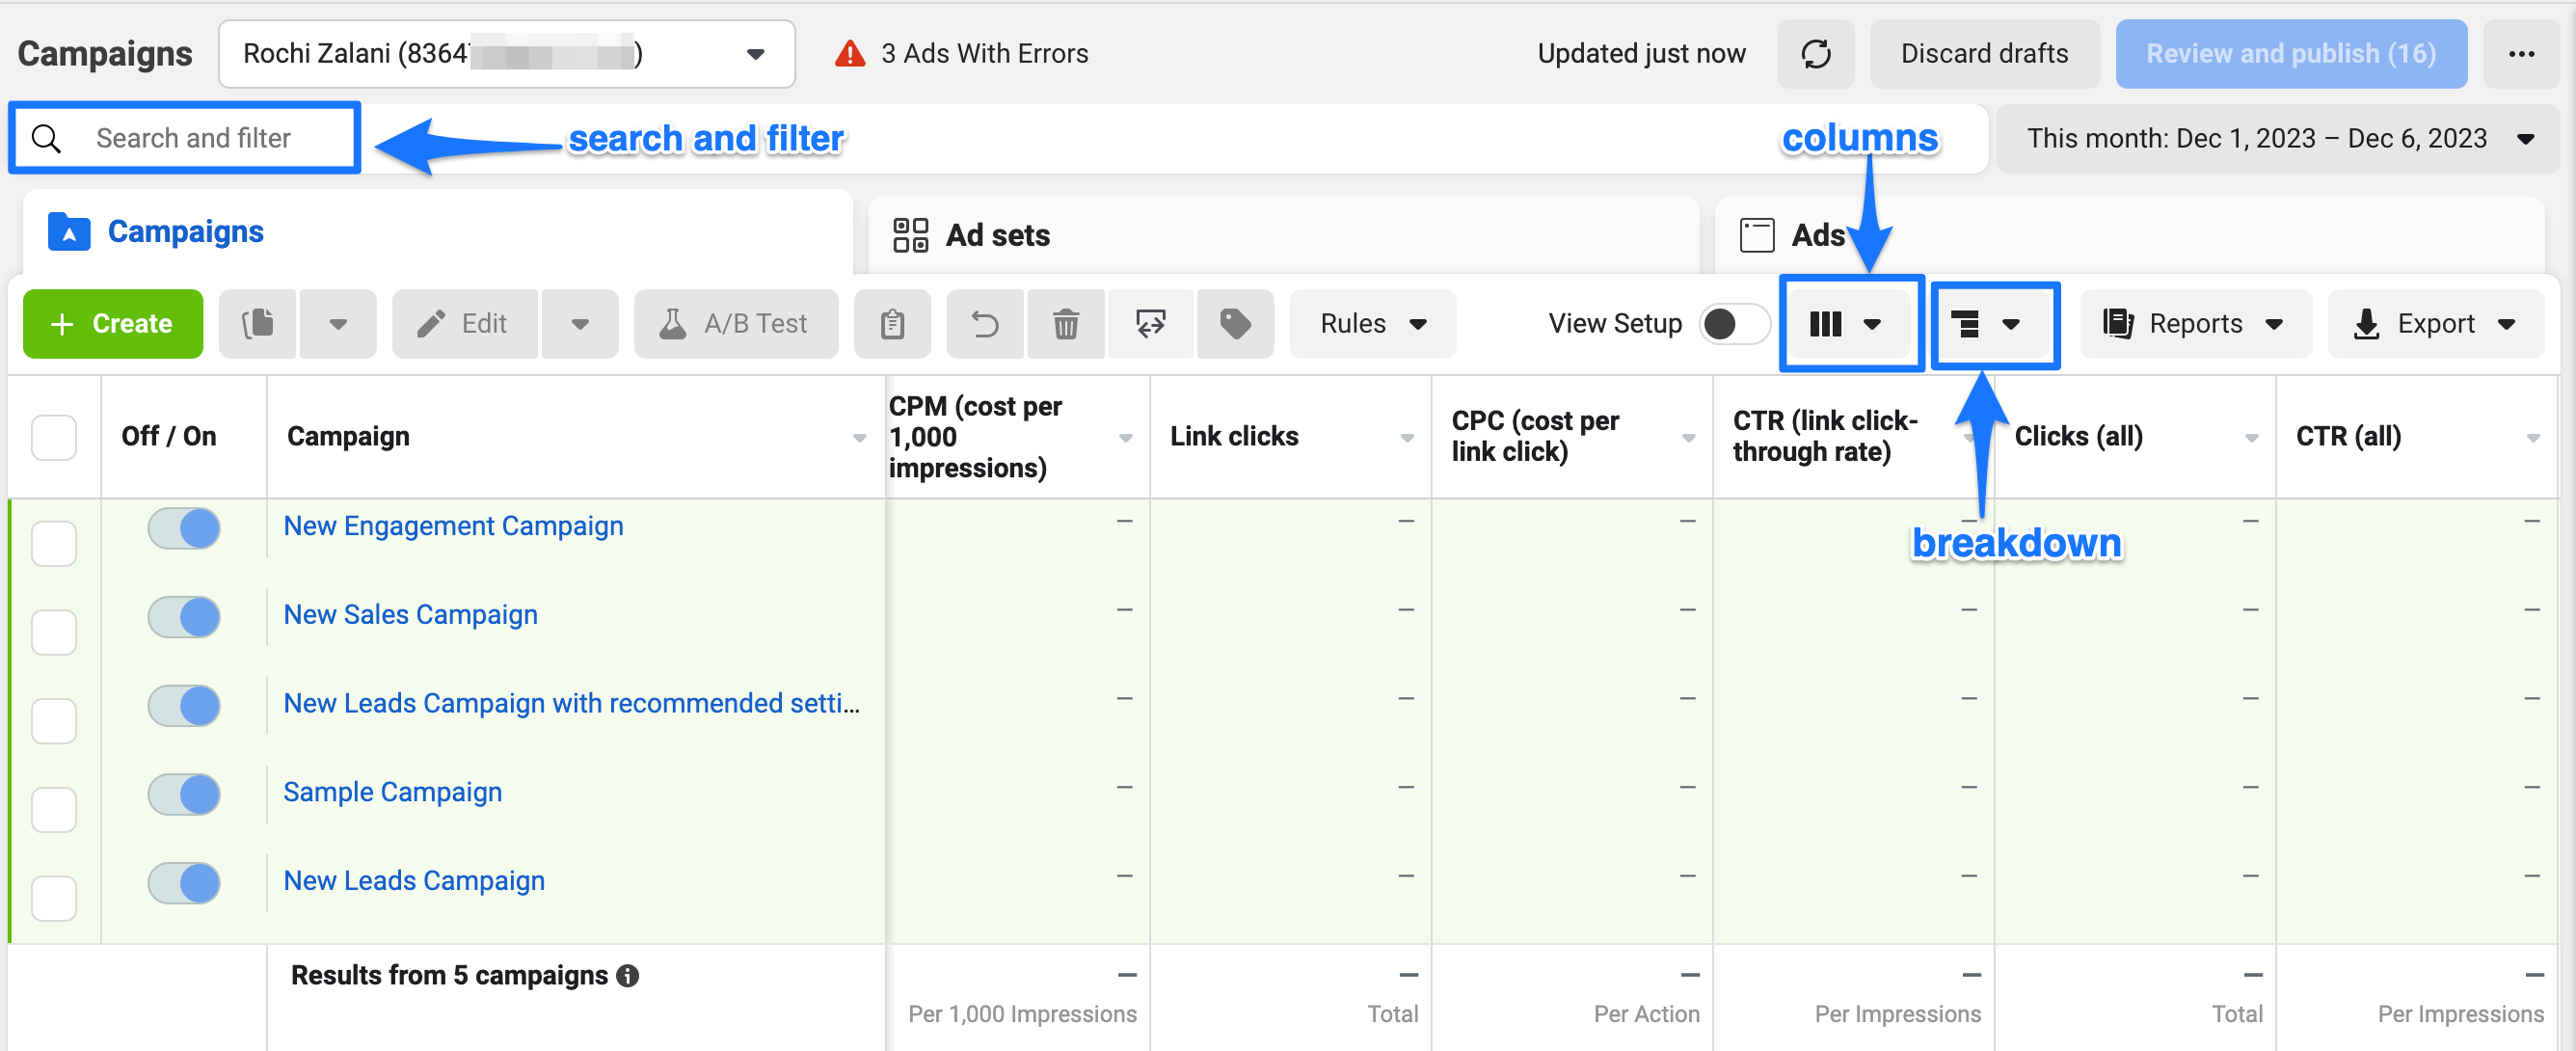
To create custom reports of all of your various metrics, you can use Meta’s ad reporting feature. It appears in the left-hand side options in your ad manager.
Meta’s reporting capabilities allow you to dive deep and understand exactly how each ad is performing. Monitoring the numbers you care about regularly is useful for ensuring you’re meeting your social media goals. These numbers also help you understand what’s not working and modify it for better results in your next ad campaign.
Instagram ads aren’t in a silo
Instagram advertising is a great addition to your Instagram strategy. But ads alone aren’t the only way to grow on Instagram. While ads may boost your Instagram reach in the short term, advertising without organic efforts is not a well-rounded social media strategy.
As you dabble with the Meta ads manager, don’t forget to also continue your organic marketing efforts side-by-side. Wondering where to begin? Here are some ideas on what to post on Instagram.


